
Introduction
Welcome to the Aptono documentation! Here, you'll find comprehensive instructions on installing and utilizing Aptono. If you encounter any problems, don't hesitate to visit the Aptono Discord server for assistance.
- To get started, press the index button in the top left corner (
 )
) - Looking for something specific? Search the documentation using the search button (
 )
)
🚧 This documentation is under construction 🚧
Good to know
Beta release
Aptono is currently in beta release. We think Aptono is good enough to be used in the real world, but it not battle tested yet and the documentation is not yet complete.
We will continue to include feedback into the design until it is ready for an official release.
Fit for purpose
Aptono was designed to be a general purpose administration and communication tool. It provides various features that allows its users to build highly customized dashboards and reporting functionality. However, it might not provide every feature required for your specific use case. The purpose of providing the full-featured free version of Aptono is to allow thorough testing of its features, such that users can determine its fit for purpose by themselves. We would love to hear from you in case you miss certain features.
Safety
On that same note, Aptono prioritizes robust data security measures to safeguard your information to the fullest extent possible. However, it's important to acknowledge that achieving 100% immunity from hacking attacks in digital information systems is unattainable. If you intend to store sensitive data within your Aptono installation, it's very important to conduct a comprehensive assessment of associated risks. We strongly advise seeking third-party expertise to thoroughly evaluate your specific circumstances.
Prepare
There are some things to consider before installing Aptono. Below you can find some points of attention that will help make everything go smoothly.
System Requirements
Aptono is compatible with a wide range of computers running supported operating systems. The hardware requirements vary depending on your specific usage scenario.
Data added to Aptono is stored in the computer's RAM memory, meaning that the more data you add, the more RAM is necessary. A basic installation of Aptono with an empty database consumes around 50 MB of RAM, while typical setups may require approximately 8 GB of RAM. Additionally, data is stored on the computer's hard drive, requiring at least an equivalent amount of disk space. It's worth noting that faster disk read and write speeds can improve Aptono's performance.
While most tasks are not limited by processing speed, operations involving intensive filtering may benefit from a high performance processor.
An internet connection is required to connect the license server. If this is not compatible with your use case, please contact us.
A smtp server is required for sending emails concerning user account management. Aptono communicates to the smtp server over port 587.
Users who want to open the dashboard need a modern web browser that supports wasm and Opengl.
Supported Operating Systems
Currently Aptono supports Windows 10/11 and Ubuntu 22.0. Other linux distributions might work but are not tested. We are working on expanding list of the supported operating systems.
Backup system
It's required to implement a backup system for the data stored in Aptono. While Aptono itself doesn't include a built-in backup feature, you can manage backups through either an automatic backup program or a manual procedure. Please note that Aptono does offer a restore function, allowing you to roll back data to a previous point in time. However, this function is not a substitute for a robust backup system. Therefore, establish a reliable backup mechanism to safeguard your Aptono data.
Secure environment
Every digital information system is susceptible to hackers trying to compromise the system. To make a digital system secure, a lot of things need to be considered. It is important to regularly get a third party expert opinion on your particular situation, because things once considered safe might change. To minimize the risk, it is important that the so called 'attack surface' of your setup is as small as possible. This means that hackers have less opportunities to attack your dashboard. Below your can find some general pointers on making an Aptono setup safer:
- Run Aptono on a computer that is dedicated to running Aptono. Do not install any other software on it, do not use it for any other tasks.
- Run Aptono on an isolated part of the network (DMZ), such that other important elements of your network cannot be reached and vice versa.
- Make sure the software and hardware drivers are fully up to date and make sure there is a procedure in place to keep them up to date. This includes drivers for supporting hardware, like routers.
- Disable as many features as possible on the operating system that are not required. Think for example about unused network sharing and remote access features.
- Use a firewall that only allows network traffic to and from Aptono and blocks suspicious network traffic.
- Store the encryption key on multiple separate physical devices and keep them in secure offline locations.
Installation
Step 1: Download Aptono from the main website
Go to Aptono.com and read terms and conditions and the privacy statement. If you agree, go to the download page by clicking at the top bar on download. Fill in the form with your data and click submit. Your download will start shortly.
Step 2: Place files
Extract the zip file that was downloaded. The zip file contains all the files that are needed to run Aptono. There is no installation process. Place the files from the zip in a folder where you want run Aptono from. Note that you can still pick another folder for data storage later in the installation process.
Step 3: Start Aptono
Start the application by running the file Aptono (Aptono.exe on Windows, Aptono.bin on Linux). For the first launch of the program, go through the setup process as described here. There is a gui version and a cli version of Aptono. Running the executable automatically starts the gui version. Using the cli version is described here.
Setup
During the first launch of the program, Aptono will guide you through a setup process. The steps are:
- Register your Aptono account and connect with the license server: see here.
- Create an encryption key: see here.
- Fill in the settings form: see here.
Once completed, you can start the server, see here.
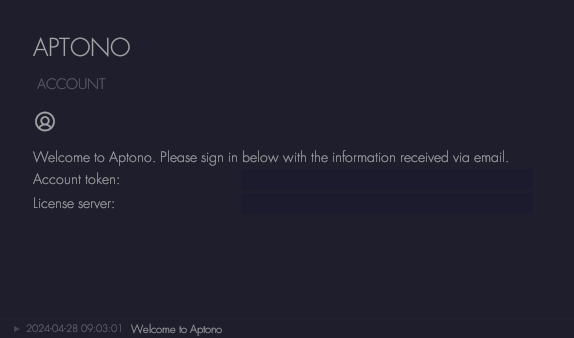
Register and login
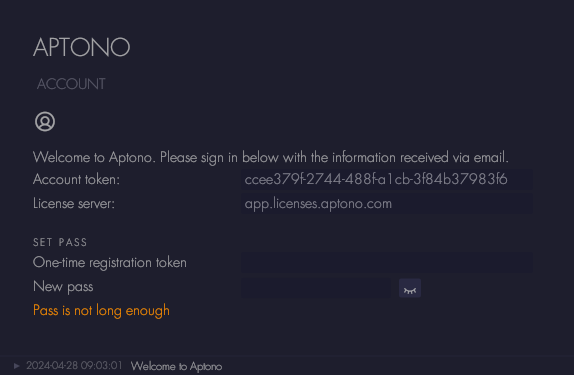
To be able to use Aptono, you need to register with the license server. The license server is an external server to which you connect via the internet. It is where Aptono keeps track of how many login account and endpoint licenses belong to your account. When opening Aptono for the first time you will see the login window as shown below. The 'Account token' and 'License server' link are sent to the email account that was used to download Aptono from the website:
The account token is unique to your account, it should be kept private. If the license server was reached successfully, you will be asked for the 'One time registration token'. This token can also be found in the registration email. Then provide a password for the account:
After registration you will be asked to login in with the provided password:
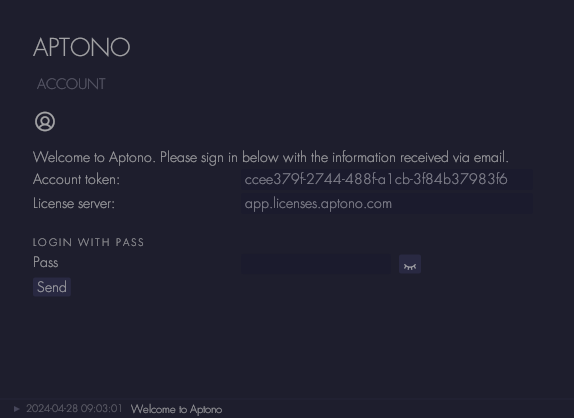
The next step is to create an encryption key, please continue here.
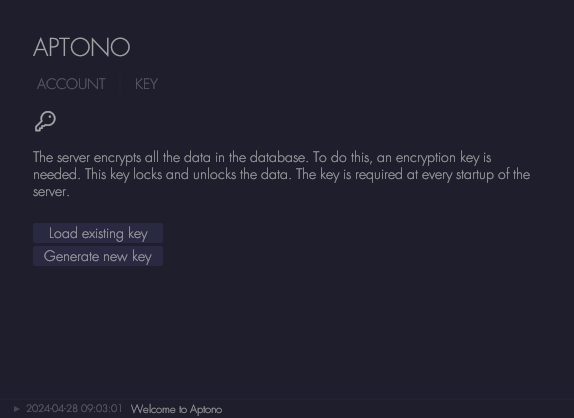
Encryption key
Aptono encrypts all data that is stored within it. An encryption key is used for locking and unlocking the data. The encryption key needs to be provided every time Aptono is started. During the first start up of Aptono, you will be asked to generate a new key or provide an existing one. To generate a new one, click 'Generate new key'.
Please consider the following:
- If the encryption key is lost, the data within Aptono cannot be accessed anymore.
- Aptono (the company) cannot recover data of which the key is lost.
- Always maintain a backup copy of the encryption key stored on a separate device. This ensures that you can recover the keys in case the USB stick is lost, damaged, or becomes inaccessible.
- Treat the USB stick as a sensitive piece of equipment and keep it in a secure location when not in use. Avoid leaving it connected to the server, unattended or storing it in easily accessible places.
- Consider a USB stick that offers hardware encryption or security features, such as password protection or built-in fingerprint readers. These features can help protect the keys from unauthorized access if the USB stick falls into the wrong hands.
- Implement appropriate security measures to protect the keys from unauthorized access or theft.
- Consider contacting a third security advisory party for advice for additional measures needed for your particular use case.
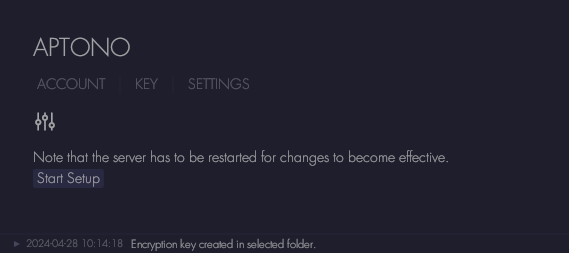
The next step in the setup is the settings window, see here.
Settings
Aptono can be configured for different situations. This is done in the settings window. To open the settings window, click on the 'Start setup' button:
1: Name of dashboard
You will first be asked to provide a name for the Aptono dashboard. This name will be shown on the login screen of the dashboard and in email communications to users. Its typically set to the name of the organization or department that is using Aptono.
2: Admin email
Provide an email address for the administration account for Aptono. The administration account is the first account to access the dashboard and can access the admin page of the dashboard.
3: External domain
Specify if Aptono should use an external domain name. If an external domain name is used:
- the dashboard can be made accessible from the web.
- Aptono will enable https, which means that all data transferred between the dashboard and the server is encrypted. To do this, Aptono will automatically generate and maintain an encryption certificate via Let's Encrypt.
- Aptono will enable WebAuthn, which allows users to sign in with a passkey instead of a password.
- You can install the dashboard as an app on a computer or mobile device.
A registered domain name is required, which can be obtained from a domain name registrar. The DNS records for the registered domain need to be adjusted to point to the static external ip address of your network. Please consult with the documentation of your registrar to find out how to do this.
Hosting Aptono from the network of your organization to the web
To make the dashboard accessible from the web, the network needs a static external ip address which is provided by your internet service provider or vps provider. Please consult with your provider for more information about this.
To reach the server from the web, the router of your network needs to forward web requests to the internal network address of the server. To do this, please consult the documentation of the router. There are security risks involved with allowing web traffic to reach a computer in your internal network. Consult a security expert for advise on your particular situation. Also read the security notes given here.
Internal network
If Aptono should be reachable from an internal network only, disable the external domain name option. Currently Aptono does not support internal SSL certificates, so encryption between the dashboard and server will be disabled. Only use Aptono on a network that can be trusted. WebAuthn only works with external domain names, so it will be disabled as well.
If you enabled a external domain name, continue to #4a. Otherwise, continue to #4d.
4a: Setup domain name
Enter the external domain name that Aptono should use. Note that Aptono will add a 'app.' subdomain to the external domain name.
Provide the external static ip address of your network. This van be a V4 or a V6 address.
4b: Authentication methods
Determine which sign-in methods can be used for the dashboard. Note the admin account always uses a password.
4c: DNS settings
The setup forms generates the required DNS settings for the external domain name. Go the DNS settings of your provider and enter these details.
Please continue to #5: External SMTP server setup
4d: Setup internal network address
Enter the address on which the server can be reached on the internal network. Typically this is the internal ip address of the server. For example: 192.168.0.112
5: External SMTP server setup
Aptono communicates via email with users, for example for account invitations and password tokens. To do this, a SMTP server is needed. This can be the SMTP server of the email provider of your organization, or a dedicated SMTP server. Note that when you are using an external domain, most likely the provider will also provide a smtp server. If you are not using an external domain, services like Google Gmail provide free SMTP services which can be useful for small applications.
6: Port
Specify the server which Aptono needs to open to receive and send data. Use port 443 if you enabled an external domain name. Use port 80 if you did not enable an external domain name at step 3.
7: Data folder
Select a folder location where Aptono should store the encrypted data of the database. Select a folder that can be accessed with low latency to ensure the best performance. Prefer a local SSD drive over a network drive.
8: Roll back period
Select how long Aptono should keep data available to allow rolling back to a previous state of the database. To read more about rolling back, see here.
Start server
Once the setup is completed, you can start the server. Go to the 'Status' tab of the server window. Click on the 'Start server' button:
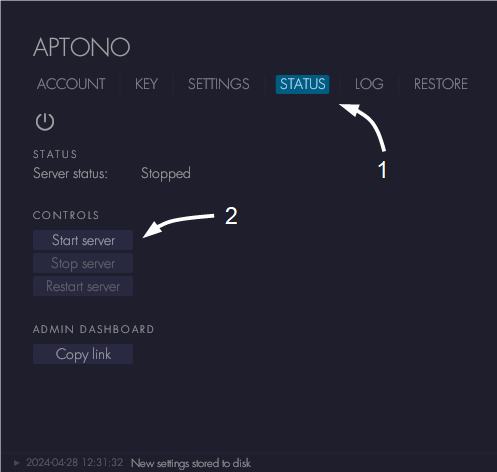
If everything is setup well, the server status indicator will show 'Running' or 'Running with TLS certificate' depending on the setup. If an error occurred, it will be shown in the indicator and in the logs.
Click on the 'Copy link' button to copy the admin dashboard link to the clipboard. Open a browser, paste the link and login into the dashboard. If the SMTP server was setup correctly, an email will be sent to the admin account which gives the login details as well.
Common problems
| Type | Description | Solution |
|---|---|---|
| TLS Certificate | The cached certificate is not valid | Delete the cached certificates by deleting all files in the 'Tls' folder in the Aptono installation folder. |
| Connection error | The Lets Encrypt server could not be reached, please check if the server has access to the internet. | |
| Other | In most cases this means that Lets Encrypt could not reach the Aptono server via the given domain name. This could be an issue with the DNS settings or the router settings. Make sure that the Aptono is reachable from the internet. Use this website to get more information. | |
| Initializing error | Cannot decrypt data | The wrong encryption key was loaded in combination with the selected data folder. Select the correct encryption key. |
| Email / SMTP | Not authorized to send emails from this address | The provided SMTP email address is not correct in combination with the given username. The account that belongs to the username does not allow sending emails from that address. Note that the username and the email address are the same for most SMTP servers. |
Tour
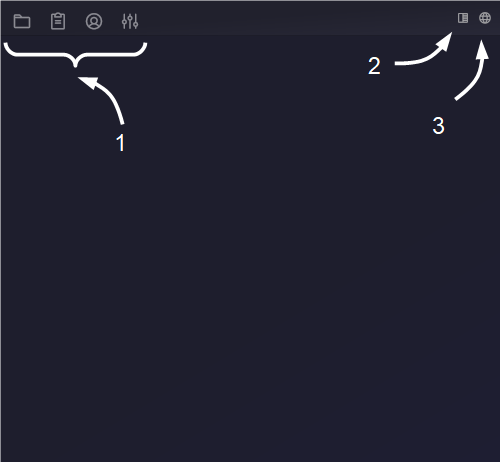
The Aptono dashboard is were all the users will interact with the database. On the top left, the main menu items (1) are shown:
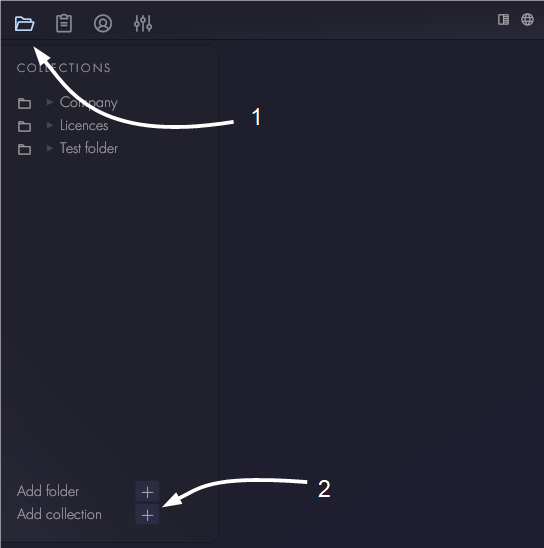
- Collection folder: this is where collections are shown, created and organized.
- Task tab: this is were users can find their currently active tasks.
- The account tab: this is where users can see and change their account details.
- The admin tab: this is where environments are managed and permissions tags are created. Only available for system admins.
On the top right corner there are two items:
- On small screens: the second side bar (2): for small window sizes (like mobile devices) there is second sidebar which shows all the open tabs.
- On bigger screens: the theme switcher. Currently Aptono supports a light and dark color theme. Aptono will automatically open in light or dark mode depending on the current time. Users can switch here manually to another theme. On smaller screens, this button is shown at the bottom of the second side bar.
- The connection status and sign-out button (3). The Aptono dashboard maintains a constant connection with the server to receive updates and changes to the database by other users. The status of that connection is shown here. Users can also use it to sign out of the current account and go to the login window.
The dashboard works with tabs. Multiple tabs can be opened and moved to different locations. To move two tabs next to each other in one window, drag one of two open tabs by its drag symbol to the desired location. Move a tab back to the top bar by dragging it onto a free spot in the top bar as shown below:

Install as app
When using an external domain, Aptono can be installed as an app. This functionality is supported by certain browsers, like Chrome. When the dashboard is opened in Chrome, look for the install button in the address bar:

On Chrome mobile, go to the dashboard, open the menu and look for the option: 'Add to home screen'. This will install Aptono as an application. You will find it between the other installed apps, called as Aptono with this logo:

🚧 Terminology
Below an overview of terms that are used in this documentation that might need some context.
| Term | Description |
|---|---|
| Add form | Used by users for adding new records to a collection. |
| Aptono | The program that runs on your server, contains the database and serves the dashboard. Aptono stands for Apto Repono, which roughly translates to Adjustable Storage. |
| Aptono company | The company behind the Aptono program |
| Collection | A 'collection' of records, which all have the same template. |
| Dashboard | The program that runs in the browser and gives users access to the database |
| Edit form | Used for reviewing and changing data in records. The contents and format can be changed by collection admins. |
| Field | A single data point on a record. |
| License server | The server that is maintained by Aptono company. This where you Aptono account is registered and license info is stored. |
| Record | A single item in a collection which contains data. |
| Record template | The definition of what kind of data a record contains. |
| Section | Part of a record template that has similar permissions. |
| User | People that use the dashboard to interact with the database. |
| Visitor | Users that do not have admin permissions to a certain collection. |
Collections
Collections is where data is stored within Aptono. You can visualize the collections within Aptono as a good old fashioned document cabinet. Each drawer of the cabinet is a collection and has records in it of one particular type. The template for these records is defined by you. Typically you will need many collections to make a good data model of your use case.
Create a new collection
To create a collection, go to the bottom of the folder window. Click on the button: "Add Collection". Once pressed a new collection will show up at the bottom of the folder structure, below all other collections.
Collection settings
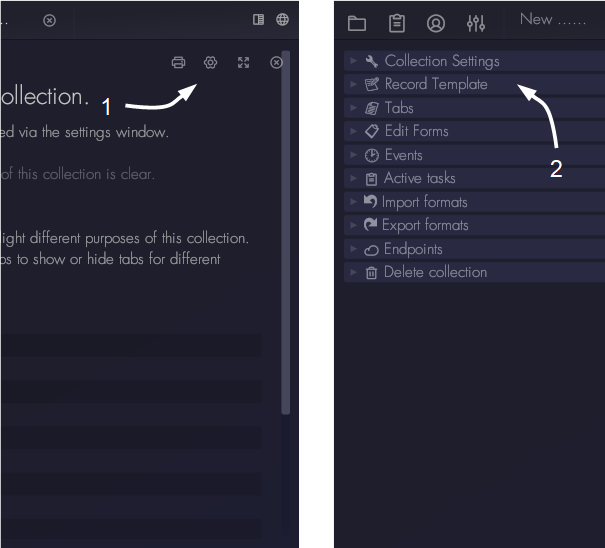
To access the settings of a collection, first open the collection itself by clicking on it in the main folder. Then in the top right corner of the tap there is a settings button:

This will open the settings tab. If there is enough space available in the current tab, the settings will be placed next the collection tab. If not a new tab will be opened. See the next sections for more details about the collection settings.
Make collection visible to others
By default the new collection is not visible to other users. They need to be added as either administrator or visitor of the collection. This is done by setting the collection permissions, as described here.
Set who can create new collections
To create a collection you need to have the right permissions. You can adjust the required permissions via the environment settings. To do this, you first need to have some permission tags defined. You can read how to do this in the section permissions.
General settings of a collection
In the general settings you can change the name of the collection and its permission settings.

Collection name
The collection name is shown in the main folder and in the dropdowns when selection reference collections. Please don't include sensitive information in the collection name. Users that do not have permission to see the collection will not see it in the collection folder, but name itself might be included in reference data.
Collection permissions
For more information about setting permissions, please refer to the Permissions section. Below a description is given of what the different settings control.
- Admins: Collection admins can change settings of the collection, including its permissions. They are the only ones that can open the settings window. They are also the only ones that can freeze and unfreeze fields in records of that particular collection. Besides that they have all the permissions to create / read / update any record.
- Visitors: visitors can open the collection but cannot change settings or change the freeze status of fields. Visitors cannot automatically create, read or update records. For that they need additional permissions which are set in the settings below.
- Visitors/create records: If visitors have the permissions specified here then they will be able to create records.
- Visitors/read records: visitors will see the records and can use the table to filter / search in the collection.
- Visitors/update records: visitors with these permissions will be able to change the values of the fields in the record.
Note that for visitors there are also section permissions that control access to sections of records. These are defined at the sections settings.
Organize collections
Collections are accessed via the sidebar in the Aptono dashboard. They are stored in a folder structure that allows to organize them in any meaningful way. This is done by dragging them in out of folders. To place a collection in a folder, drag it by its symbol:
Folders can be dragged into folders by the same method. To rename folders click on its settings icon, which is only visible when the folder is expanded. Note: just like with collection names, it is advised to not put any sensitive information in the folder names. They will not be visible in the sidebar of users who do not have access to them, might they be included in reference data.
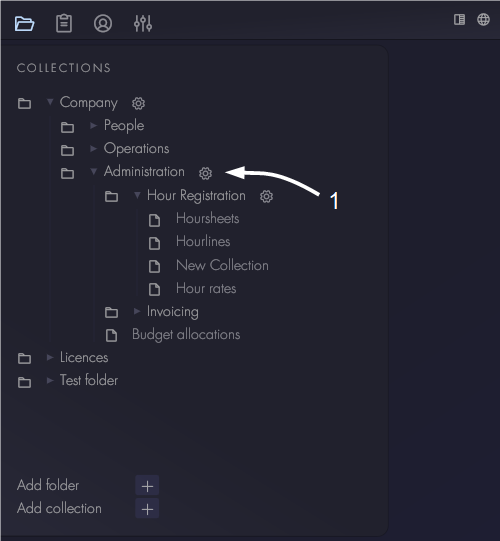
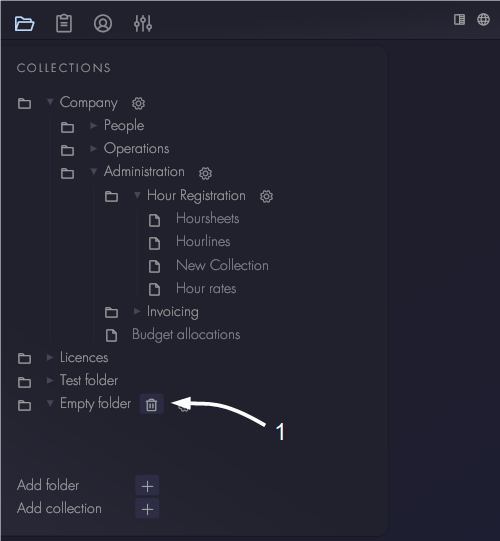
To delete a folder, click on the trash icon, which is only visible when the folder is empty and expanded:
Folder visibility
A folder will be visible to other users if it contains a collection that they have access to. If they do not have access to any of the collections, the folder will not be shown.
Record template
The record template defines what kind of data a collection can store. It is made up of different sections, each with different fields. A field is single data object, like a name or date for example.
When you create a collection, it will contain one section and one field. To change the template, go to the 'Record Template' section of the collection settings window.
The next chapters will described how to set up and use the sections and fields of a record template.
Sections
A record template can have multiple sections. The purpose of adding multiple sections can be:
- Each section can have its own permission settings. This means that some sections can be visible to some users but not others. This can be useful for protecting sensitive information, but also for workflows. Imagine a record that has a input section and a review section. If the review section is only visible the the reviewers, you can make sure that other users are not bothered by fields that they do not have to fill in.
- With sections you can organize your record template. Some record templates might have many fields, by grouping them into similar sections the record template stays nice and organized.
Create a new section
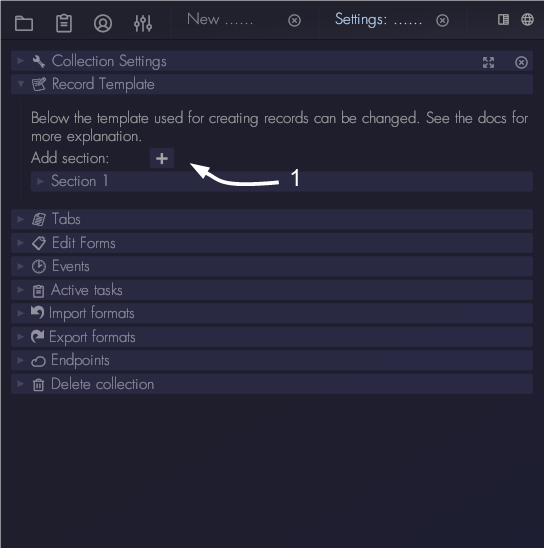
To create a new section, go to the 'Record template' part of the collection settings.
Each collection comes with one section by default. To add a new one, click the 'add section' button in the 'Record template' window.
Section settings
Each section has two permission settings: 'Read section' and 'Edit section':
- Read section: this specifies which visitors of the collection can read that particular section. Important note: this permissions works different from the other permission settings we seen before. If you leave this one empty, it means that everyone can see the section. Only if you add permissions to the 'Read section', then only those you have added will see the section. It was designed like this to avoid making new sections a tedious job, because you would have to add all permissions many times for each section.
- Edit section: this specifies which visitors can edit the section. The same applies here as for the 'Read section' permissions: if the permission settings are left empty, it means that every visitor can edit the section. If it is not empty, only those with the specified permissions can edit the section.
Note that if you add permissions to a section, it might have influence on which users can create records as well. To read more about this please refer to the Permissions section.
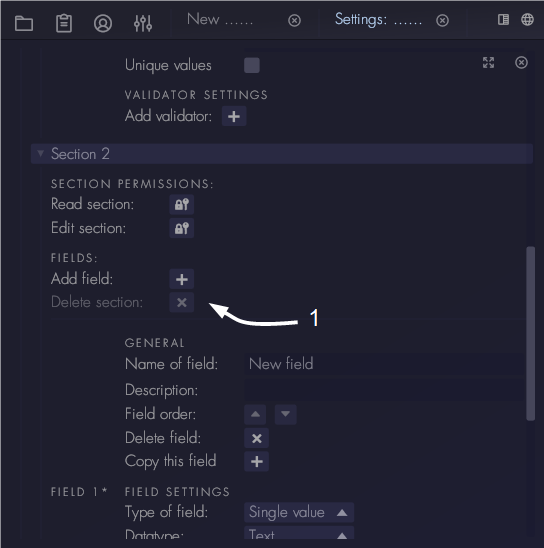
To delete a section press the delete button as shown below. Note that a section can be deleted only if:
- there are more than one sections in the collection.
- there are no fields in the section.
Fields
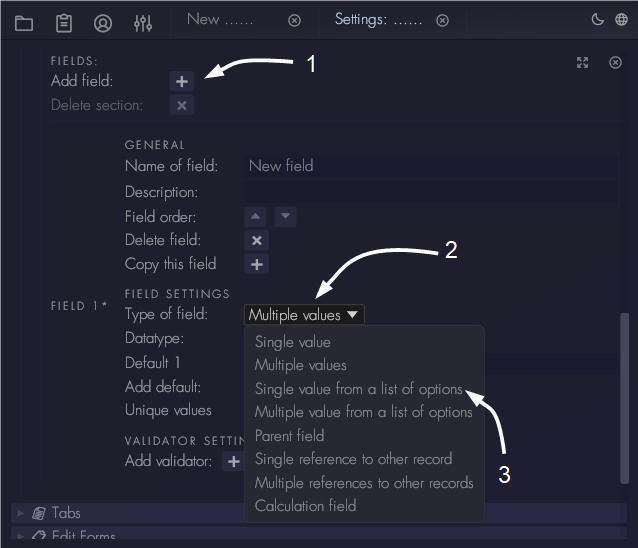
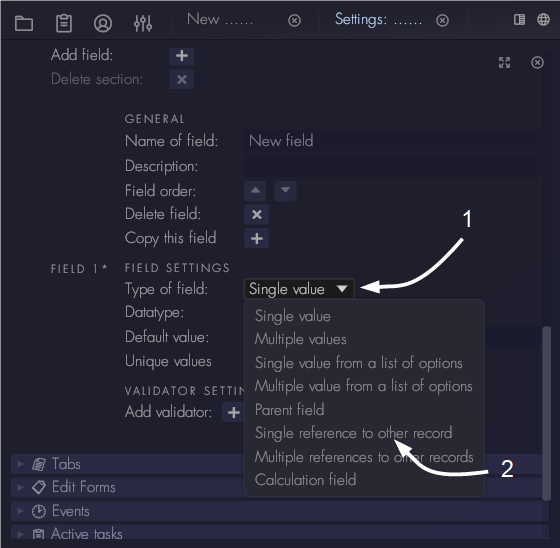
Aptono stores the data of the record in fields. Each record template can have multiple sections, each with multiple fields. A field has a certain type, which indicates what type of data it contains. The types are:
- Single value: a single value field contains one data point, for example one name or one number. It is the most common type of field.
- Multi value: a multivalue field contains a multiple of data points.
- Single value from a list options: with this type you can define a list of options in the template, of which the user can select one in the record.
- Multi value from a list options: Same as the single value version, but here users can select multiple values from the list.
- Single reference to another record: with this type a user can select a record from another collection, based on certain filter settings which narrow down the possible selection.
- Multiple references to other records: same as the single version, but users can select multiple records.
- Calculation field: If there are number fields in the record, then this field type can perform basic calculations on them.
For each type of field you can choose a certain data type. Below you can see an overview:
| Datatype | Single value | Multi value | Single value from a list of options | Multi value from a list of options |
|---|---|---|---|---|
| Text | yes | yes | yes | yes |
| Markup | yes | no | yes | yes |
| Decimal number | yes | yes | yes | yes |
| Integer number | yes | yes | yes | yes |
| Currency | yes | yes | yes | yes |
| Date | yes | no | no | no |
| Boolean | yes | no | no | no |
| Password | yes | no | yes | yes |
| Unique id | yes | yes | no | no |
| Email address | yes | yes | yes | yes |
| Url | yes | yes | yes | yes |
| Specific point in time | yes | no | no | no |
| Day number | yes | yes | no | no |
| Week number | yes | yes | no | no |
| Month number | yes | yes | no | no |
| Quarter number | yes | yes | no | no |
| Year number | yes | yes | no | no |
| Planning | yes | no | no | no |
| Login account | yes | no | no | no |
| Login right | no | yes | no | no |
| Image | yes | yes | yes | yes |
Add a new field and general field settings
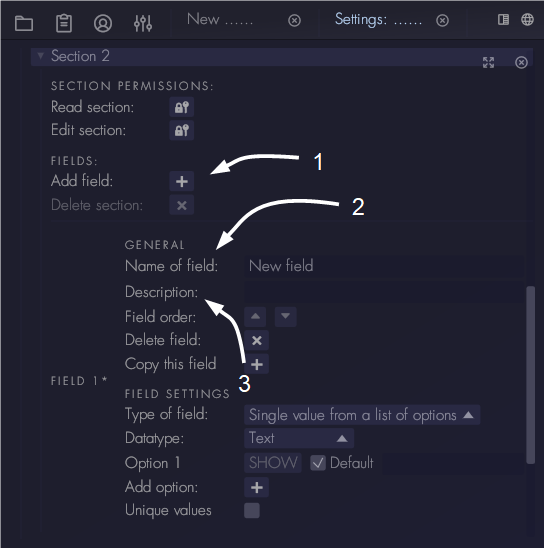
To access the settings of a field go to the collection settings (see here). Go to the sections settings (see here). To add a new field first pick the right section in which you want to add the field. Then:
- press the 'Add field' button in the window.
- Specify a name for the field. This name will show up in tables and forms, so a good name helps the users of the collection with understanding the purpose of the field.
- Specify a description for the field. The description will be shown on the add form of the collection, to help users understand what they need to fill into the field.
Besides the general settings each field type has its own settings, which will be described in the following chapters.
Single and multi value
Single value fields and multi value fields have the following settings:
- Datatype: select which datatype you want this field to have. To see which data types are compatible, see here.
- Default value: if a value is entered here, it will show up on the add form by default. This value is also used when a user sends an incomplete record to the server. This might happen when the user does not have access to all the sections of the record. For more info see Permissions. Note that for multi value field types, the default values have to be unique.
- Unique values: require each record to have an unique value in this field, a value that is not present on any other record in this collection. When enabled Aptono will first check all records currently in the collection before accepting a new record. If the new record has an unique value in this field, the record will be accepted. If it does not, the record will be rejected and the user who sent the record will receive a message. This can be useful for example for serial numbers or unique naming of items.
- Validators: validators are used to constrain the possible input into a field. Validators check the value that the user puts into the field and accepts or rejects it. When it rejects the value, it shows an error message to the user. Different data types have different validators. See here for more on specific validators.
Using multi value fields
Multi value fields need to have unique values within one field. You cannot add two times the same value within one field.
Values from a list of options
Single value from a list of options and its multi value variant are useful when you want to limit the possible values a user can input. It is also more convenient to select something from a list then to input a piece a text for example. Options are defined in the 'Record template' section of the collection settings.
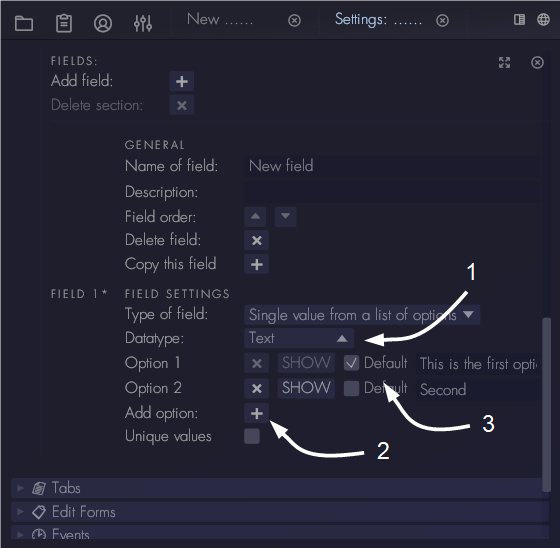
To add a option field, first create a new field as is described here. Then select the type of field option and click on 'Single value from a list of options'.
Then select the data type that you want to have for this field. Options can be added by clicking the 'Add option' button. You can select which option you want to be selected by default on a new record by clicking on 'Default' in the settings window.
Options and existing records
When there are existing records in the collection the ability to modify the options of a field is limited:
- You cannot delete options that are in use, because this would create invalid records. You can however hide the option if you don't want to show it for new records. To do this click on the 'SHOW' button in the settings window, (see picture above). Alternatively, an option can be made visible again by clicking the 'HIDE' button.
- You cannot change the value of an option that is in use. Aptono will check which options are in use and return an error.
Data types
Below an overview of each data type is given with instructions on how to use its validators. To see an overview of which datatype is compatible with which field type, please refer to this section.
Text
The text data type is a general purpose field data type. Use it for names, comments, descriptions or any other information. The text type comes with text validators described below. Note there is limit of 1024 characters for the text data type.
Markup
With a markup field you have a bit more space to input text. The markup field supports basic formatting as described here. To show the formatted markup, the field needs to be shown as non-editable. When the field is shown as editable, the raw input is shown. To read more about editable and non editable input, please refer to this section. The markup field supports text validators.
Decimal number
Decimals numbers are used for any non-integer data. Units can be added to the field which can help in calculations, see also below. Decimal numbers have number validators, as described below.
Integer number
Integer number fields only allow integer numbers. Number validators and units are supported.
Currency
Currency data type fields are similar to decimal numbers but they will also be displayed with two digits behind the dot.
Date
The date field allows the user to pick a date from a widget. This data type has no validators. See also the 'Specific point in time' date type.
Boolean
The user can select yes or no.
Password
The user can specify a password, which should meet these requirements:
- Should be at least 10 characters long
- Should have at least one number
- Should have at least one capital
- Should have at least one lower case
- Should be complex enough. This is tested by an algorithm that scores the givin input on length, the amount of similar characters and special characters.
Unique id
This allows the user to generate a unique id. The generate id will be an uuid.
Email address
This data type is the same as a text data type, but has validators build in that check if the input has the format of a valid email address. Note that Aptono does not check if the email address actually exists.
Url data
This data type is the same as a text data type, but has validators build in that check if the input has the format of a valid url. Note that Aptono does not check if the url actually exists.
Specific point in time
This data type allows the user the specify a date and time. No validators are supported.
Day, week, month, quarter and year numbers
This data type allow the user the pick a certain number that matches to the selected time period. For example, for month numbers, the user can give input between 1 and 12. The user can also let Aptono automatically fill in the current value. For example if the selected data type is Day number, Aptono will input the current day. An offset to the current value can be specified as well.
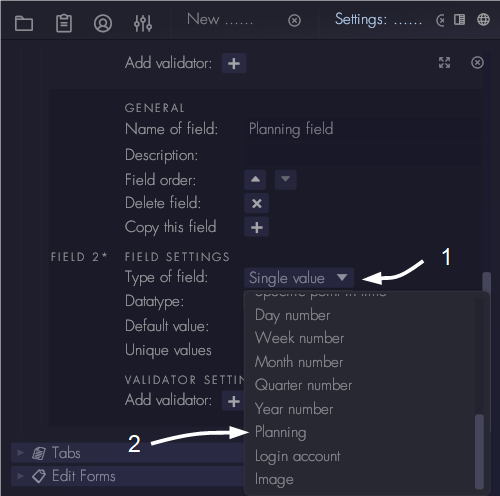
Planning
This allows users to specify a planning using a Gantt style widget. More information can be found here.
Login account
This data type allows the user to create a login account for Aptono. Each new record will contain a login account. More information can be found at this section.
Image
The user can upload a png or jpg image. The maximum allowed file size is 10 mb and the maximum dimensions of the picture is 1920x1080 pixels. If the image does not meet these requirements, Aptono will try to rescale the image or reject it if it fails. Note that adding large images will use a lot space in the Aptono database. For most purposes, large images will not be required for a good quality print. So it is advised to keep image sizes as small as possible.
Units
Most number data types support units. Units make it clear to the user what kind of number they should fill in. And they are used by calculation fields to check unit consistency. Aptono comes with a predefined list of units.
| Category | Name | Abbreviation |
|---|---|---|
| Currency | Euro | € |
| Thousand Euro | k€ | |
| Million Euro | Mil € | |
| Dollar | $ | |
| Thousand Dollar | k$ | |
| Million Dollar | Mil$ | |
| Time | Seconds | sec |
| Minutes | min | |
| Hours | hour | |
| Days | day | |
| Weeks | week | |
| Years | year | |
| Mass | Gram | g |
| Kilogram | kg | |
| Metric ton | ton | |
| Distance | millimeter | mm |
| centimeter | cm | |
| meter | m | |
| kilometer | km |
Note that other units, that are not in the list, are not yet supported in calculations. Aptono is working on expanding this list for future updates. Please let us know which units you would like to see.
Conversion between time units
As described in the calculation field type documentation, units can be converted to another scale. For time units this is not straight forward, because a year is not a fixed amount of seconds. Note that Aptono assumes that a year is 365 days * 24 hours * 60 minutes * 60 seconds. Be aware that for calculating multi year averages this might not be correct.
Validators
Most data types support validators, which can be added to the field definition of the record template. Validators are used for limiting the input users can send to a record. Note that it is possible to add multiple validators to a field. Aptono will require that all the validators accept a new value, before adding it to the record. To add a validator press, 'Add validator' at the bottom of the field settings. Then selected the correct type:

Text validator
Most text data types comes with regex validators. With these validators you can limit the range of possible values that will be accepted by Aptono, for new records and for modifying existing records. For example:
- To make sure users always start with a capital letter, use this regex: ^[A-Z]
- To make sure users always send input of 15 characters long, use this regex: .{14,}
To get a particular regex you can ask any of the AI tools (like ChatGPT) to help you. To check if a regex works properly you can use this website.
Number validators
There are three type of number validators:
- Range: the input value should in between the upper and lower limit.
- Match: the input value should be equal to a set value.
- Divisible by: the input value should be divisible by the set number, with a remainder of zero.
Planning fields
Planning fields will show a Gantt widget in the record. The user can add planning items to it and show deadlines. To add a planning field please create a new field as described here. Use a single value field type and select the 'Planning data' type:
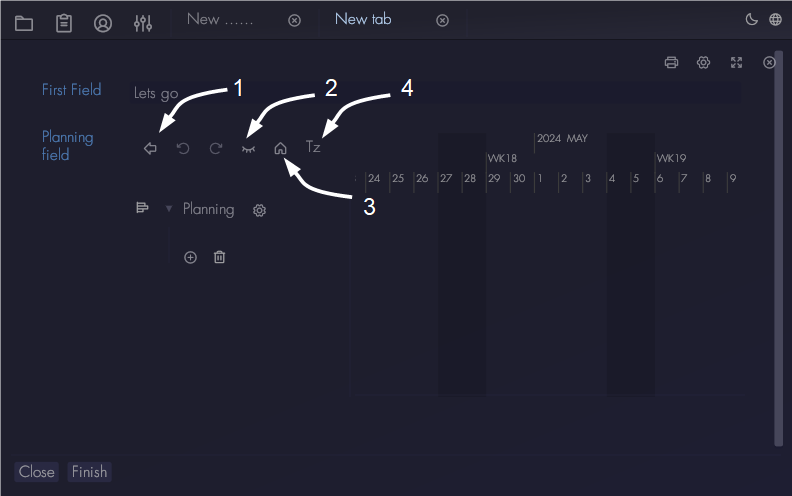
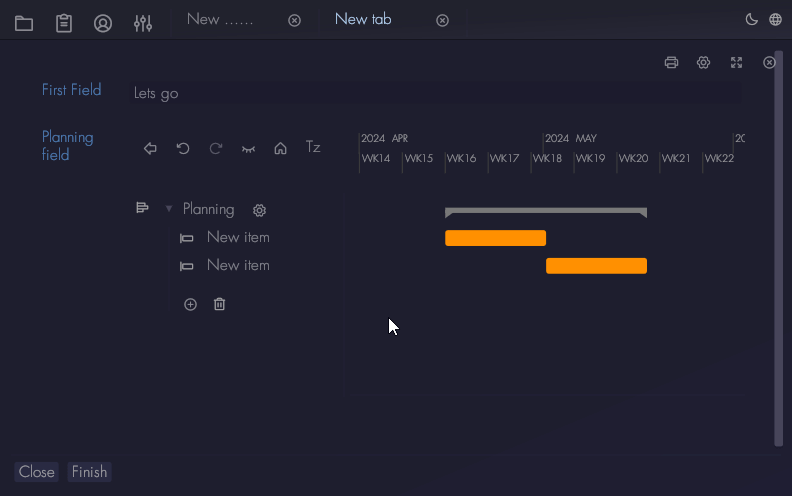
Users have some controls over how the widget looks. These controls can be found at the top left of the widget:
- Show or hide the side panel to get more space for the actual planning
- Show or hide the 'today' bar, which indicates the current time
- Return to the original view of the widget
- Change the timezone of the horizontal axis
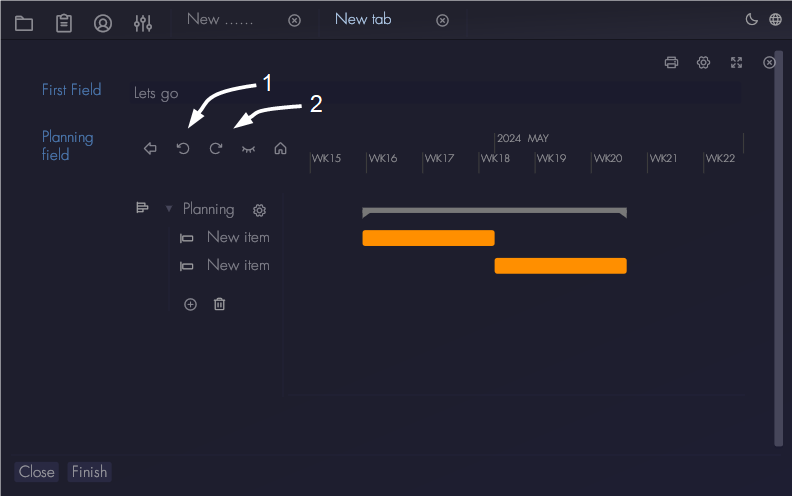
Besides that the user can zoom and drag the planning area with mouse or touch, to highlight important sections of the planning. The time axis scales from minutes to years. To zoom the timescale with the mouse, use the scroll wheel. To zoom the vertical axis, hold the left mouse button and then use the scroll wheel. To zoom both axis, use the right mouse button and scroll wheel.
To add items to the planning use the add button at the bottom of the sidebar. Users can pick one of three objects:
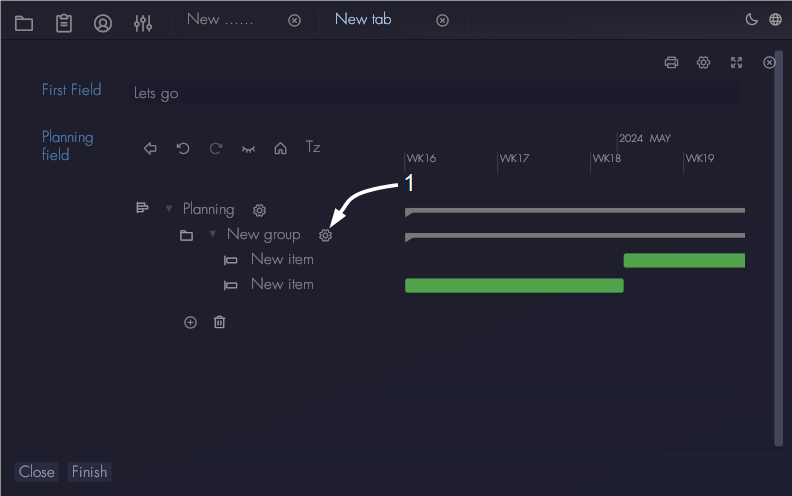
- A group: this allows grouping of planning items that are related to each other. Groups can be collapsed to keep a clear overview.
- A planning item: this is a horizontal bar in the Gantt chart.
- A milestone item: this is a either a vertical bar or a marker on the Gantt chart.

Actions can be undone or redone by using the controls at the top left of the widget:
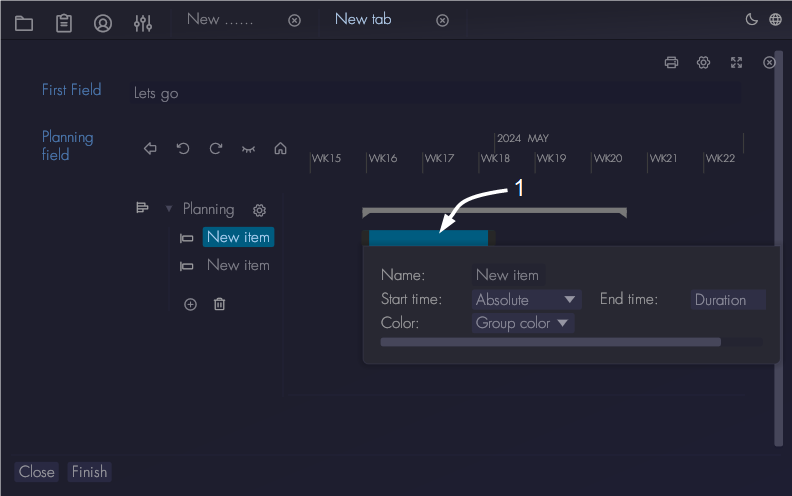
To change the settings of a planning item, click on its bar. It will show the following settings:
- Name of the planning item. This is the name that is shown in the sidebar.
- The type of start time of the item. There are two types of start times: absolute and relative. Absolute means the user sets the start time manually. Relative means that the start time depends on the end time of another planning item or group. To make a planning item dependent you can drag it onto the item on which it needs to depend. To set it back to absolute, use the start time setting shown below.
- The type of end time of the planning item. There are two types of end times: absolute or duration. Absolute means that the user manually sets the end time of the planning item. Duration means that the duration of the item is set and the absolute end time will depend on the start time of the planning item.
- Color: the bar in the Gantt chart. The user can choose to use the same color as the containing group or use a unique color.
To make a planning item dependent on another item, drag it on the item on which it should depend like shown below:
To place a planning item into a group, drag it onto the group of which it needs to be a part of. You can choose the order of items either dragging it below or above another item:
To change the name and color of a group, click on its settings icon:
Reference to other records
Each record can have multiple references to other records. In the edit forms of the record, information from the referenced record can be displayed. This is useful for building up more complex data models and to avoid having the same information in multiple locations. There are two types of reference field types: single and multi value. With single you can pick a single record from another collection, with multi you can pick multiple records from another collection.
To add a reference to another record, go the the 'Record Template' section in the collection settings window (see here). Go to the sections settings (see here). Add a new field, (see here). Then make it a reference to another record by clicking on 'Type of field' and select 'Single reference to another record'.
Pick a collection to reference
Select which collection you want to reference. To be able add to reference a collection you need to have admin rights to that particular collection. The dropdown menu will show all available collections. For some collections the settings might not have been requested yet. To request the permission settings, click on the collection name. The collection will be requested from the server and the permissions will be checked.
Choose a display field
Choose which field of the reference collection you want to use to show the referenced record in tables. Note that once a field is chosen to be a display field, the definition of that particular field cannot be changed anymore.
Choose the type of reference
There are multiple ways in which you can reference to another collection:
- Pick from list and refer: this is the default way of referencing a record. Only a reference is made to the other record.
- Pick from list and inherit: with this setting the reference record is also inherited. This is used for example for permission tags inheritance, see also
For multi reference fields, there are two additional reference types:
- Create and refer: this allows users to create new records within the current collection. This can be useful for users to avoid having to open multiple collections to achieve something.
- Scan records and refer: with this setting records are automatically added as reference based on a filter. Whenever a user adds a new record that matches the filter, Aptono will add the new record as a reference to this field. In this context you should use relative filters (filters that use information of the record to filter), otherwise every new record of the referenced collection will be added to every record of the current collection. To read more about filters please refer to Filters.
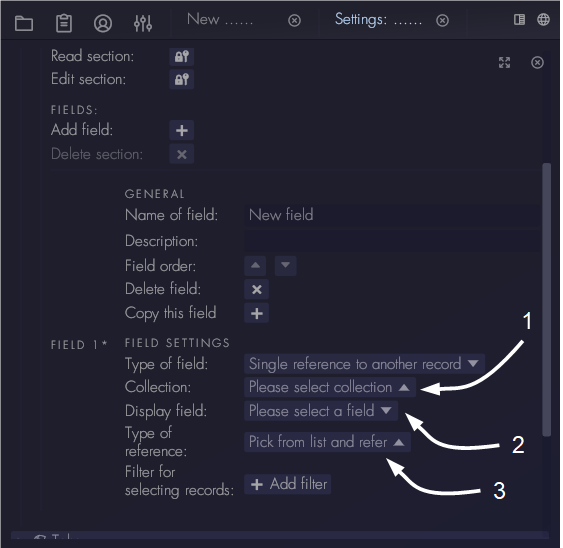
Filters
The filter settings indicate which records are allowed to be referenced. When the user wants to add a reference in the record, first the allowed records are collected from the server by using the filter. Then the user will see a list from which they can pick the record they want. In this context relative filters are available. This means that when the user opens a record the filter can use information from that particular record to scan for reference records. For more information please refer to Filters.
Calculation values
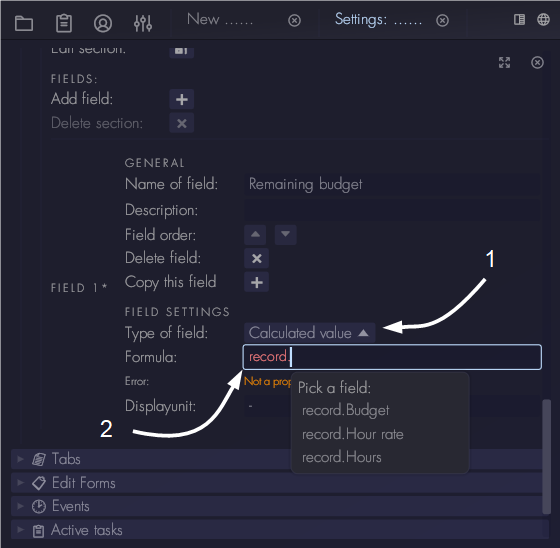
Calculation values bring spreadsheet functionality to Aptono. A calculation field takes a formula as input and calculates the answer based on information in other fields. A formula can reference to a field within the same record or to a field that is in a reference record.
To add a calculation field to a record, you first need to have fields with number data in them or reference records that have number data in them. Then add a new field which will be the calculation field. At 'Type of field' click 'Calculated value'. To reference a value from another field start by typing 'record.' in the formula. A list of available fields will be shown in a dropdown. If there are no fields visible, it means the collection does not have any suitable fields yet.
Fields that can be reference
Aptono currently only allows fields to be referenced in a calculation if it is directly within the same collection as the calculation field, or if it is one reference field away.
Using reference fields in a calculation
When using a reference field in a calculation, please keep the following behavior in mind:
- When a reference field is not set to a record (empty reference), Aptono assumes that the value is 0.0 (zero) and uses that to calculate the end result.
- When using a multi reference field in a calculation, Aptono will look up the value for each reference, calculate the sum, and use that to calculate the end result. This behavior can be used to calculate totals or sums of values.
Implications of referencing a field in a calculation
To make sure that results of calculations stay correct, Aptono applies some restrictions to the record template. Definitions of fields that are referenced in a calculation:
- cannot be changed while being referenced in a calculation.
- cannot be deleted while being referenced in a calculation.
Maximum dependents of a calculation
Currently Aptono limits the amount of dependents that can be part of calculation to 32 fields.
Adding a calculation field to a collection with existing records
A calculation field can be added to a collection that has existing records. But Aptono does not calculate values for the existing records directly. They need to be calculated manually by right-clicking on the name of the field, and selecting 'Redo calculation'. Note that right-clicking is currently not supported on platforms with touch screens.
Changing the formula of a calculation when there are existing records
When a calculation field has records with non placeholder values (see also here), its formula cannot be changed anymore. This is the case when:
- a record was added to the collection after the calculation was defined
- a manual request to recalculate the field was done This limitation prevents a large amount of fields to be changed at the same time and is applied to avoid large peaks in required calculation power for the server. In the future Aptono will support this via background processing jobs.
You can define a new field with the updated formula and delete the old field.
Units of calculation
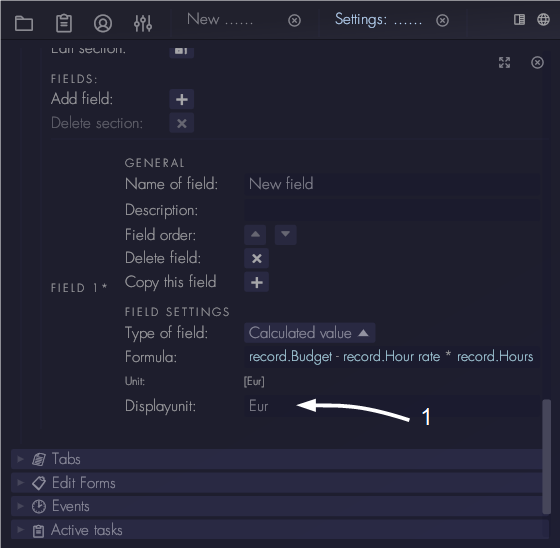
It is possible to add units to fields that have number data. When a field has a unit, Aptono can determine what the unit of the calculated value is automatically. Note that units are not required for the calculation. In the example below:
- Budget has unit [€]
- Hour rate has unit [€ / hour]
- Hours has unit [hour]
The formula Remaining budget = Budget - Hour rate * Hours will give a unit of [€]. You can scale the calculated unit by specifying a display unit:
Loop detection
Note that loops in calculations are not supported. When a definition of a calculation would case a loop, the user will receive an error message.
Adding fields to existing records
New fields can be added to collections, even if there are already records in the collection. Aptono will use placeholder values for the existing records that are derived from the default values of the new field. These placeholder values are not actually stored in the database. This allows Aptono to add new fields even if there are already large amounts of records in the collection. Placeholder values are replaced by real values when:
- a user changes the new field in a record. The placeholder value will be replaced by the received value.
- the field is part of a calculation, and the calculation is updated. The calculation result will be based on the default value. The placeholder value is replaced by the default value of the field.
- the record or any of its fields are frozen. The placeholder value is replaced by the default value of the field.
- the record with placeholder values is referenced via a reference field. The placeholder values are replaced by the default values of their fields.
- the record is part of a newly created task. The placeholder values are replaced by the default values of their fields.
Note that if a field has a placeholder value, its value that is displayed on records and in tables will change if the default value of the field is changed.
Deactivating fields
As part of a workflow it can be useful to deactivate a field of a record. This means that the field cannot be changed anymore by users. A field in Aptono can be deactivated and activated by:
- administrators of collections, by using the settings window of the record.
- automated actions resulting from events, more on this is described here.
To deactivate a field as administrator of a collection, open the record of which you want to deactivate a field. Then click on its settings icon on the top left. The popup will show the current status of the fields and allows to change them:
Deactivating and activating a calculation field
When a calculation field is deactivated, it will not be recalculated when a user changes one the dependent fields. When the field is activated, Aptono will first check if all the dependents are still available. If they are not, the calculation field will not be activated. If they are, the calculation will be redone with the latest values.
Edit forms
Edit forms are used for displaying records in Aptono. By default they will show all the fields that are accessible to the user. Custom edit forms can be created to show specific information to specific users. Permissions can be added to control which forms are available to which users.
The default edit form
Every record comes with a default edit form. This form contains all the fields in editable configuration on a single page. If a user viewing the form does not have access to a section of the record, the fields will not be shown on the default record.
Custom forms
Collection admins can replace the default form by going to the collection settings (see here). Then go to the 'Edit forms' section of the settings window and click on 'Add form':
Click on the new form to open its settings:
- Name: edit the name of the form. This name will be shown at the top of the record edit window where users can choose which form they want to see.
- Permissions: forms can be made visible to only certain users when permissions are added. If no permissions are set, the form is visible to every collection visitor. Note that all forms are visible to collection admins, regardless of the permission settings.
- Form order: determine which form appears first in the selection bar at the top of the edit window of the record. The first form in the order that is available to the user will be opened by default.
- Default font size: determine what font size to use for this form.
- Markup: this is where the contents of the edit form can be modified. Aptono uses markup to define the contents and formatting of the form. More about how to use the markup can be found here.
Widgets for edit forms
Widgets can be added to the edit forms. These widget help extend the functionality of the forms beyond the fields that are already in it. Widgets that are available:
- Table: this is a table that uses a filter to show other records that might be relevant to the current record. The filter can use information of the currently opened record to select which other records to display.
- Timeline: this is widget similar to the Gantt widget of the plannings field, but it can combine multiple planning fields into one view. This can be useful for giving a complete overview of multiple plannings into one chart.
- Embedded records: this widget allows to integrate other records into the current record, making it look like one document. This can be useful for creating reports.
More details on the widgets and how to use them can be found here.
Form inputs
To enter data in the fields of a record, form inputs are used on the edit form. Form inputs are added in the markup via the following format:
|input{field id}|
Where {field id} is replaced by a number that is the field id of the field that you want to show. The field id is assigned by Aptono when the field is created and does not change even when the name of the field is changed. To insert a form input, go to the markup editor of the edit form settings window (see here). Right click on the editor to show the selection menu. Go to 'Default Widgets' and then 'Form inputs':
There are a couple of options when displaying a form input:
- Show the input as editable or not. By default the form input is editable. To make it non editable '.ne' is added to the format. For example: |input1.ne|. The 'ne' stands for non editable.
- Show the name of the field before the input. By default the name of the field is shown. To hide the name, '.nn' is added to the format: |input1.nn|. The 'nn' stands for no name.
- If the name of the field is shown, the width that is allocated for it can be adjusted by adding '.nw(120)' to the format: |input1.nw(120)| The number indicates the width in points that the name should take up. The 'nw' stands for name width.
These options can be combined with each other. To show a form input that has no name and is not editable: |input1.nn.ne|.
Image fields
Image fields have additional formatting options to modify how the image is shown. To add formatting to a image field, go to the 'With image formatting' section:
Select the field with image data, then select which formatting to apply.
Display values
Display values are used for integrating data from records in a sentence or text section. They will have the same formatting as the text block in which they are shown. Display values can display values from other records, if there are reference fields in the record template.
To add a display value to a form, go to the markup editor (see here). Right click on the editor to show the selection menu. Go to 'Default Widgets' and then click one 'Display values':
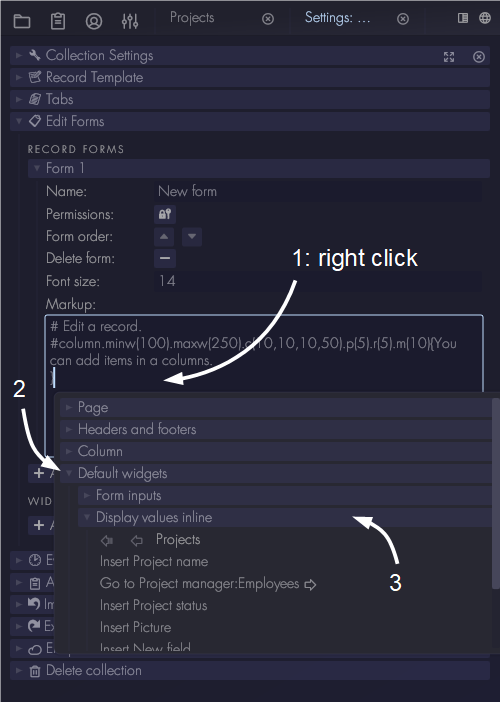
All the fields of the collection will be shown. If there is a reference field in the collection, you can click on it to show the fields of that collection.
Accessibility of data and display values
Note that when the data needed to display values on a form is not accessible by the user watching the form, Aptono will replace the display value with '-' in the form.
Tabs
Tabs are used for displaying collections in Aptono. They work in the same way that edit forms do. By default they will show an introduction text and a table with the records currently in the collection. Custom tabs can be created to show specific information to specific users.
Custom tabs
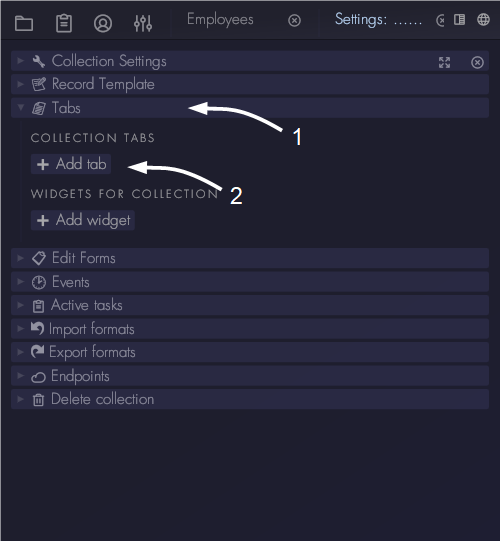
Collection admins can replace the default tab by going to the collection settings (see here). Then go to the 'Tabs' section of the settings window and click on 'Add tab':
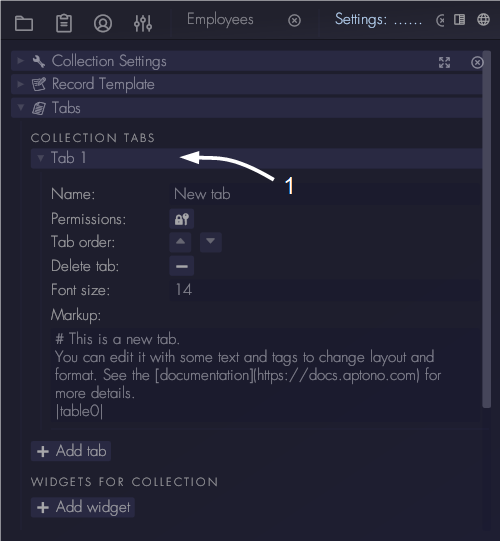
Click on the new tab to open its settings:
- Name: edit the name of the tab. This name will be shown at the top of the collection window where users can choose which tab they want to see.
- Permissions: tabs can be made visible to only certain users when permissions are added. If no permissions are set,the tab is visible to every collection visitor. Note that all tabs are visible to collection admins, regardless of the permission settings.
- Tab order: determine which tab appears first in the selection bar at the top of the collection window. The first tab in the order that is available to the user will be opened by default.
- Default font size: determine what font size to use for this form.
- Markup: this is where the contents of the tab can be modified. Aptono uses markup to define the contents and formatting of the tab. More about how to use the markup can be found here.
Widgets for tabs
Collections have two types of widgets available:
- Tables: define which records the users sees when they open the collection.
- Timeline: show the planning of multiple records in one overview . The records are selected based on a filter.
More details on the widgets and how to use them can be found here.
Events and automated actions
Aptono uses events to define when certain automated actions should be done. There are two types of events:
- Trigger events: these events occur when some user interaction is performed in the collection.
- Timed events: these event occur based on a planned point in time or based on a recurring schedule.
Both event types can be used to perform one of the following actions:
- Create record: create a new record in the collection where the event ocurred or in another collection.
- Email collection accounts: send an email message to users with the right permissions.
- Email login account in record: send an email to users of which the login account is defined within the records of the collection.
- Activate fields: select which fields of the record should be activated.
- Deactivate fields: select which fields of the record should be deactivated.
- Create tasks: select a user that should receive task and define what needs to happen in order to complete the task.
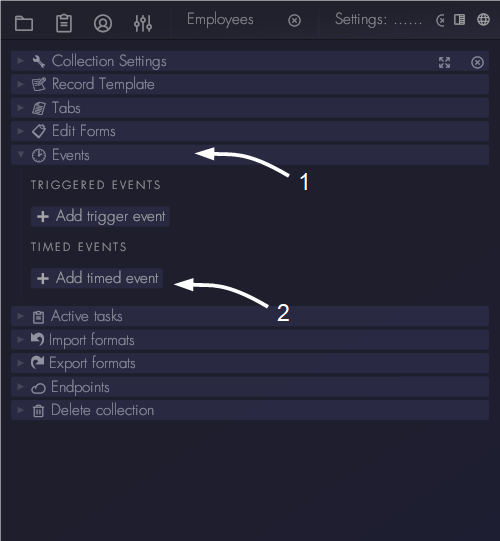
Collection admins can define events in the collection settings window (see here).
Loop detection
Note that Aptono will not allow loops to occur in the definitions of events. If a sequence of events and actions would case a loop, an error message is sent.
Trigger events
The following trigger events are available:
- Fields changed: certain fields of a record have changed to a new value.
- Fields changed to certain value: a certain field of a record has changed to a particular value.
- Record created: a new record was created in the collection.
- Record deleted: a record was deleted from the collection.
- Field activated: a certain field in a record was activated.
- Field deactivated: a certain field in a record was deactivated.
Based on these triggers, one of the available actions will be executed.
Define a new trigger event
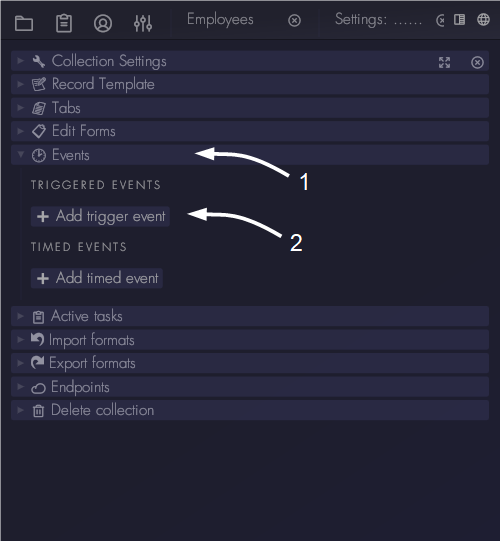
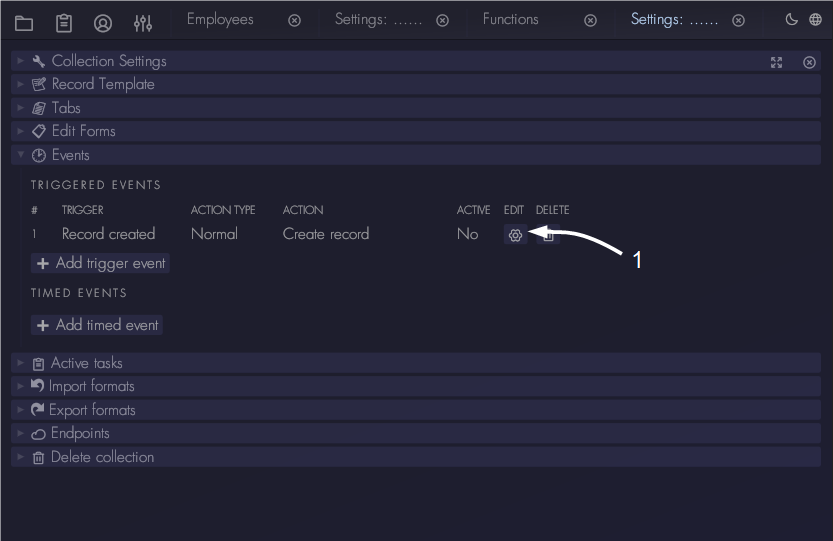
To define a trigger event, go to 'Events' section of the settings window and click on 'Add trigger event':
A new event will be added to the list. It will be marked as inactive because its settings are not yet valid. Once the event has valid settings it is send to the server and will become active. To open the settings of the new trigger event click on the settings symbol:
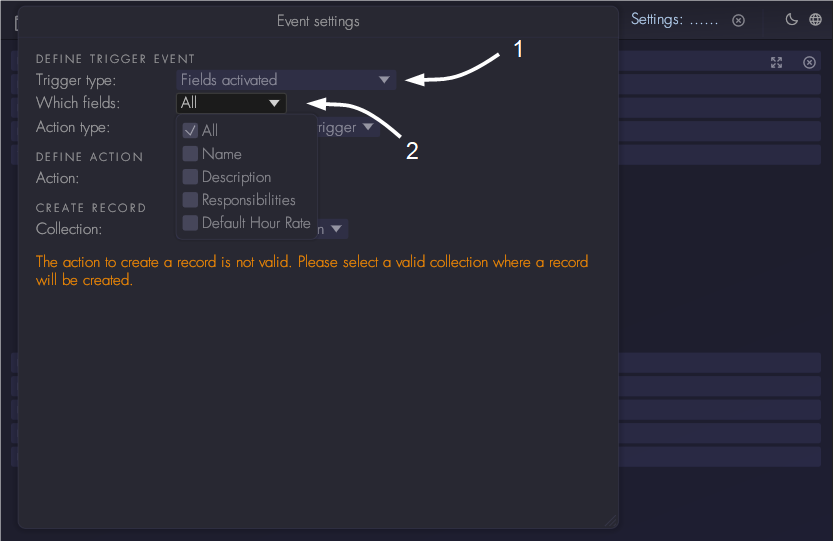
A new window will open with the settings of the trigger event. First select which trigger you want to use for this event at 'Trigger type'.
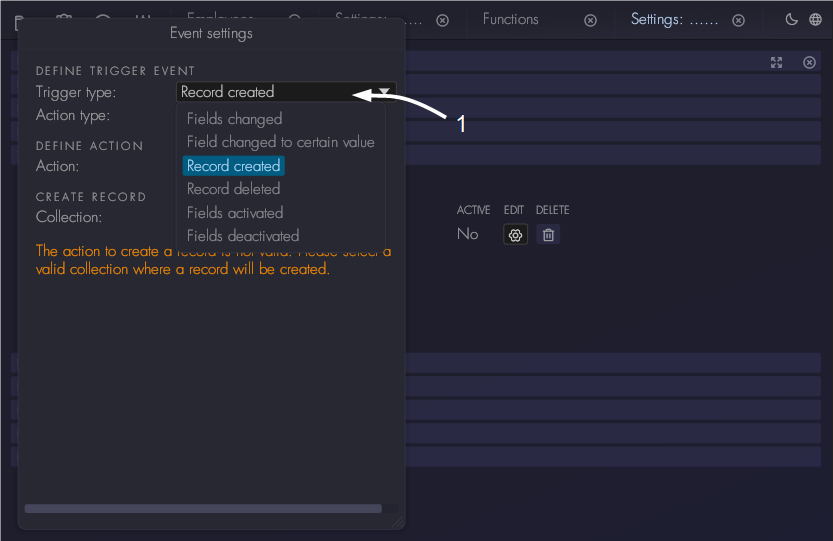
Below the different trigger settings are described. In the screenshot you will also see the settings for the actions. The settings for actions are explained here.
Trigger: fields changed
In the settings window select 'Fields changed'. This will show the settings for this trigger event, and the action that needs to be done. Click on 'Which fields' to select which fields of the collection should be monitored for changes in values:
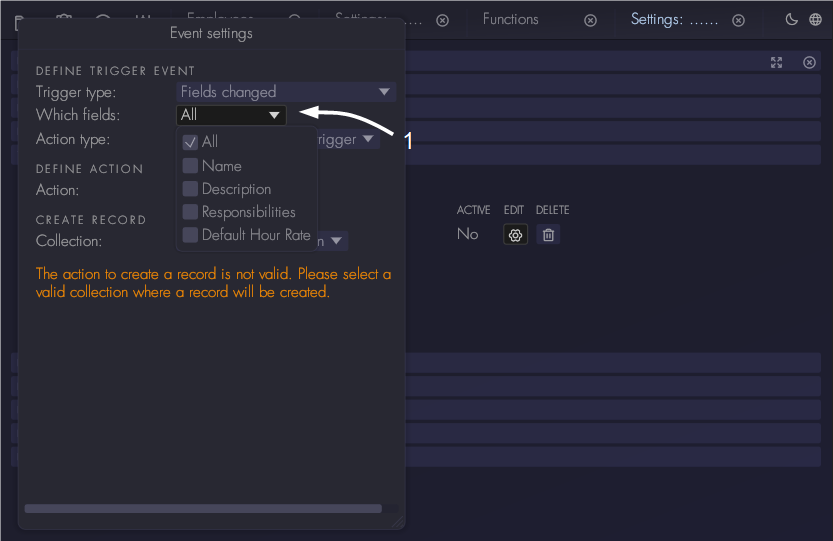
Note that if you select multiple fields, Aptono will scan if either one of the selected fields is changed. If so it perform an action.
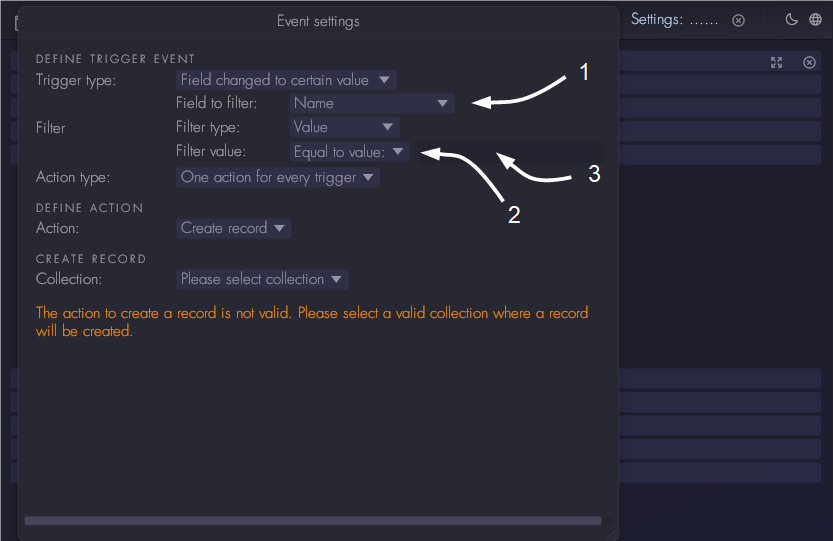
Trigger: Fields changed to certain value
In the settings window select 'Fields changed to certain value'. This trigger uses a filter to check if a certain event has ocurred. For this trigger you need to define which field you want to monitor. This is done at the 'Field to filter' field. The filter type is always 'Value' in this case, there are not relative filters available. Select if you want to monitor if the field has changed to larger value, equal to or smaller value. This is done at the 'Filter value' field. In the edit area behind this field fill in the value to reference during the filtering:
Trigger: Record created and record deleted
These don not have any additional settings. Note that records can be created manually by users, but also by automated tasks. For this event no distinction is made. Also note that if multiple records are created or deleted at the same time, the trigger will occur for every single record.
Trigger: Fields activated and deactivated
In the settings window select 'Fields activated'. Then select which fields to monitor in the 'Which fields' option. To read more about field activation and deactivation, please refer to this section.
Timed events
The following timed events are available:
- One time occurrence: the action should happen only once on a specified point in time.
- Recurrence: the action should happen regular intervals.
Based on these events, one of the available actions will be executed.
Define a new timed event
To define a timed event, go to 'Events' section of the settings window and click on 'Add timed event':
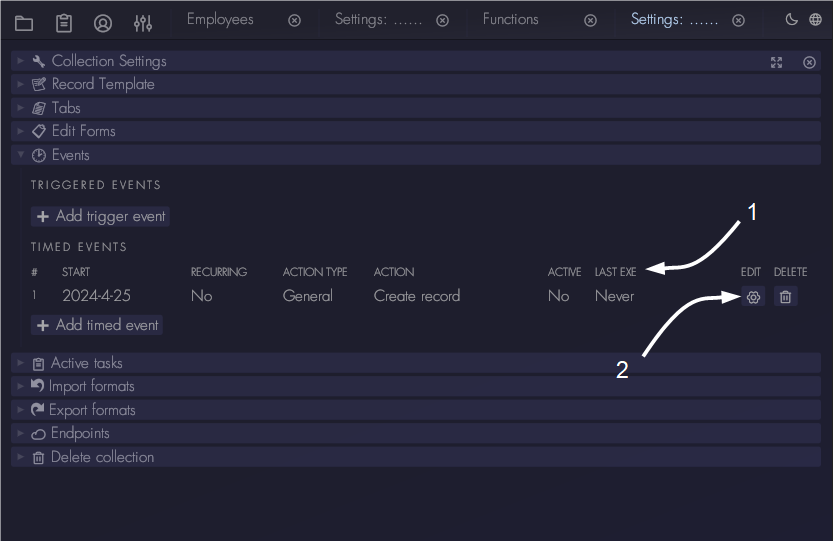
A new event will be added to the list. It will be marked as inactive because its settings are not yet valid. Once the event has valid settings it is send to the server and will become active. The list will also show when the timed event was last executed, which is useful for recurring events. To open the settings of the new timed event click on the settings symbol:
A new window will open with the settings of the timed event. Below the different timed event settings are described. In the screenshot you will also see the settings for the actions. The settings for actions are explained here.
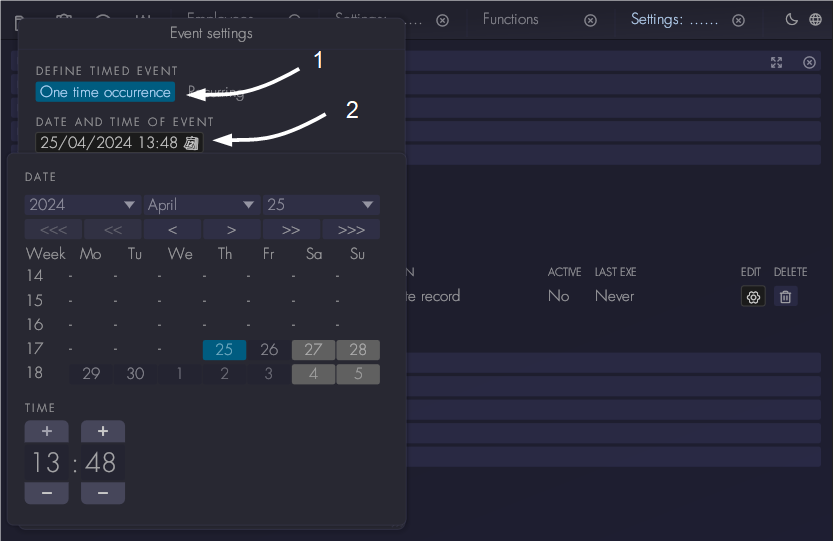
One time occurrence
First select which type you want to use for this event at 'Define timed event'. Select 'One time occurrence'. Then click on the setting 'Date and time of the event'. A window will open that allows to select the which day and time should be used for the single event. Note that events cannot be define too close to the current time, if done so the server will return an error.
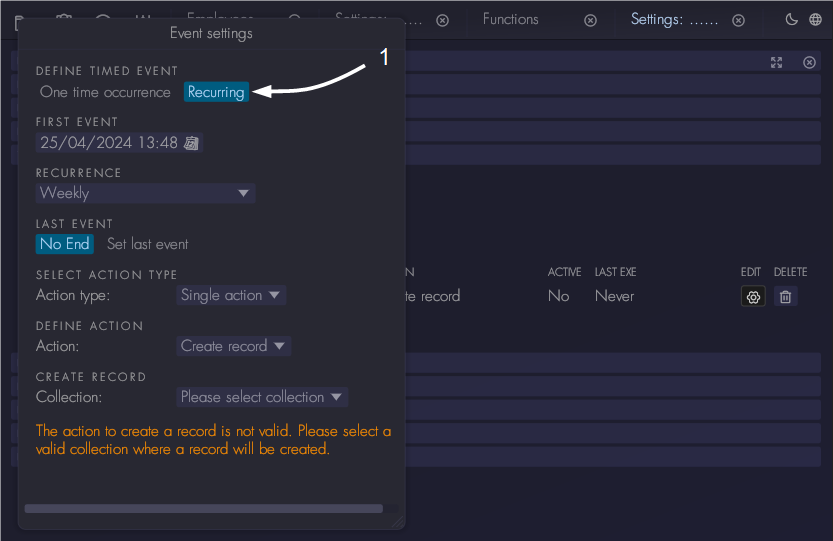
Recurring
Under the 'Define timed event' setting select 'Recurring'. First specify when the first event should occur. Then select the recurring period under 'Recurrence'. There are two options to determine the end of the recurring event:
- No end. The event will keep occurring until it is deleted from the collection definition.
- Set last event. Set when the last event should occur. The events will be planned on the defined schedule until the next event to be planned is beyond the last in terms of time. Then the last event is planned and the sequence will stop.
Missed timed events
In case the server was not turned on when a timed event should have occurred, Aptono will execute the missed event at startup of the program.
Actions
Action execution mode
There are two modes of executing actions:
- Do one action for every event that ocurred. For trigger events use the record that triggered the event as input, for timed event there is no input of records available.
- Do one action for every filter result, use the record found via the filter as input for the action. This mode requires a filter to be defined in the action. Note that this can also be a filter in other collections.
For trigger events the first mode is most commonly used, the second mode is mainly used for timed events. The mode of execution will determine if field mapping can be used to define the actions. Field mapping allows to use data from one record to be used for another record or filter. This will be shown below in more detail for each action.
| Type of event | Action execution mode | Target record for the action | Field mapping available? |
|---|---|---|---|
| Trigger | Do one action for every event that ocurred | Record that caused the trigger | Yes, data of the record that caused the trigger |
| Do one action for every filter result | Filtered record | Yes, data of the filtered record | |
| Timed | Do one action for every event that ocurred | - | No |
| Do one action for every filter result | Filtered record | Yes, data of the filtered record |
Note that for a timed event with an action execution mode 'One for every event' there is no target record. This means that action that modify a record or need a record as input are not available.
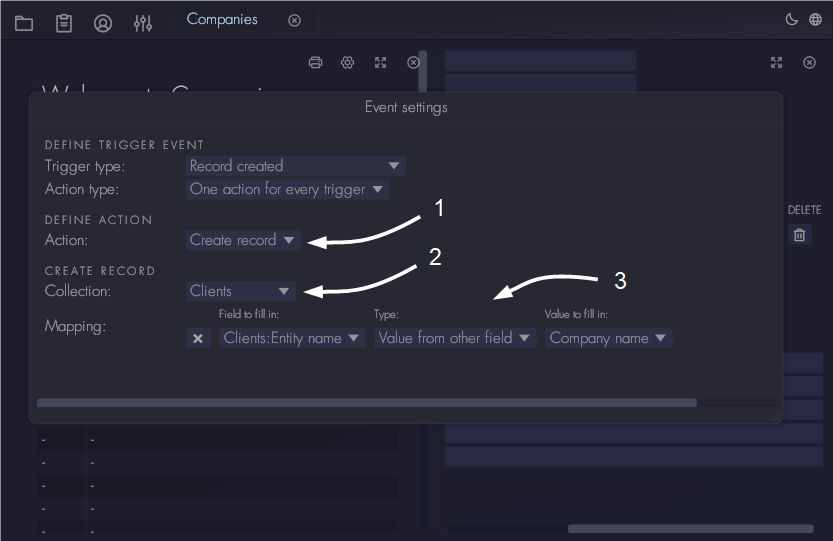
Create record action
First select 'Create record' at the 'Define action' option in the settings window of the event. Then select in which collection the new record should be created at 'Create record' setting. This does not have to be the same collection in which the event is defined or trigger occurred. Add a mapping to action if you want fill in certain values when the new record is created. If field mapping is available (see table above) it is possible to add a mapping that is based on the input data of the action.
Note that to be able to define a 'Create record' action in another collection, you need to have admin rights to that collection.
Send email to collection admins
Select 'Send email to collection admins' at the 'Define action' setting. Provide a topic for the email and write a message. When using this action with trigger events, the card that caused the trigger event can be included as reference.
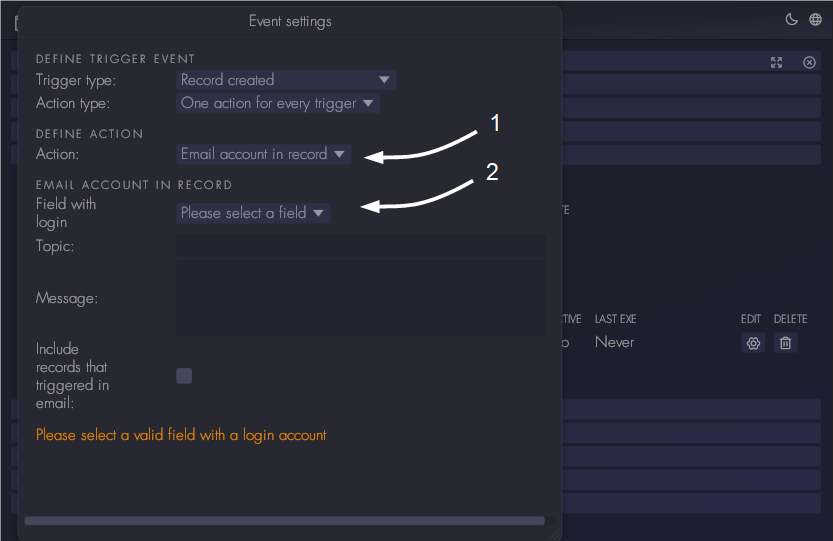
Send email to login account in record
Select 'Send email to account in record' at the 'Define action' setting. Then select which field contains the login account. Which collection is used for finding the login account depends on the action execution method:
- Do one action for every event that ocurred: the login account needs to be in the record that triggered the event.
- Do one action for every filter result: the login account needs to be in the record that was found with the filter.
If the target record contains references to other records, login accounts in those references can also be selected. Only one email per target record can be send, so multi reference field types are not available.
To finish the action provide a topic for the email and write a message. When using this action with trigger events, the card that caused the trigger event can be included as reference in the email.
Activate and deactivate fields
Select 'Activate fields' or 'Deactivate fields' at the 'Define action' setting. Then select which fields should be targeted by the action. Note that which fields are available for selection depends on which action execution mode is selected. See the table above what the target record of the action is.
Create tasks
Select 'Activate fields' or 'Deactivate fields' at the 'Define action' setting. Find more information about tasks in this section.
Tasks
Tasks can be used define workflows in Aptono. A task can be assigned to every user with an active login account.
Currently the goal of every task is to change something in an existing record. Task writers can define what needs to change in the record in order to complete the task. In the future Aptono will support tasks that have other goals like for example creating or deleting records, or tasks that serve as reminders (no concrete goals).
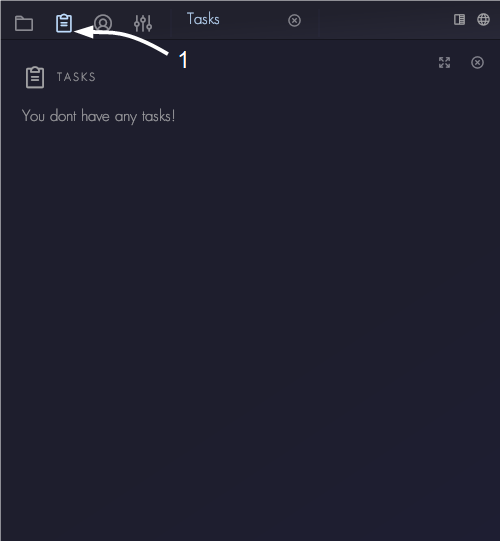
Users can find an overview of their tasks at the task window:
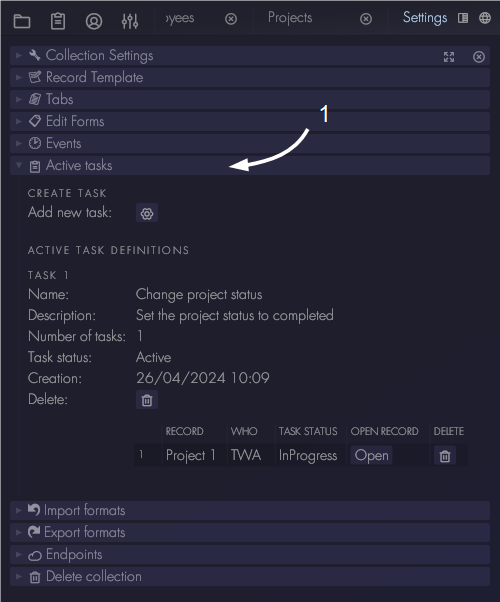
Project administrators can find an overview of active tasks in the 'Tasks' section of the collection settings window:
There are two ways to define tasks for users:
- Manually via the collection settings window.
- Via events and actions, as described here.
Create tasks manually
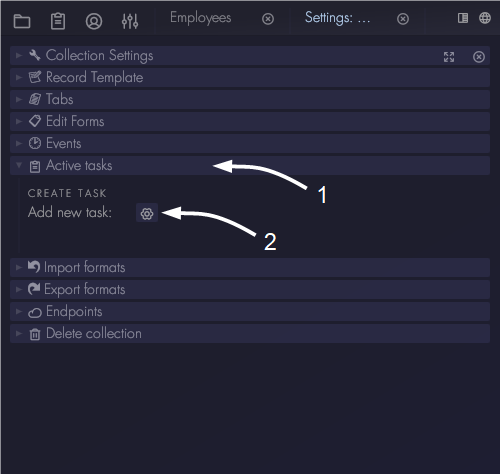
To create a task for a user manually, go to the collection which has the field with login accounts to which you want to assign the new task. Then open its settings window (see here). Go to the 'Tasks' section of the sections window and click 'Create task'.
Define a new task
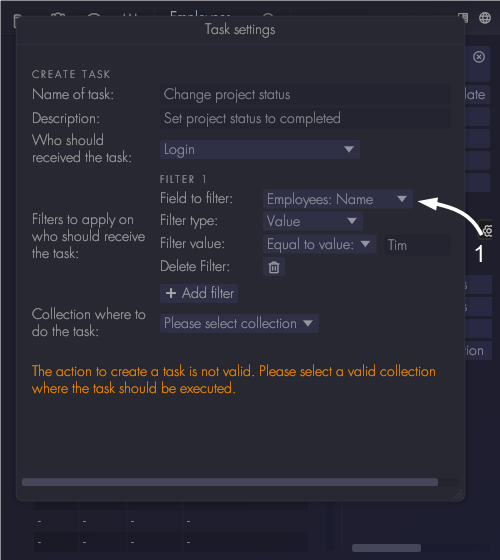
Enter a name and description for the new task. Note that the description is important, it purpose is to explain to the user what they need to do in order to complete the task. Then select in which collection the user needs to perform the task.

Select who should receive the new task. First select the field in which the login accounts are defined. Then define a filter to select who specifically should receive the task. If the filter is left empty, every record in the collection will be selected. This means every login account will receive the task. In this case every record where the field 'Name' is equal to 'Tim' will receive the task.
Select in which collection the user should perform the task. It is required to define a filter to select which records should be modified. In the settings window this filter is called 'Selection filter'. The selection filter can use information from the record which contains the login account. In this case records are selected of which the user who should do the task is selected as project manager. This works because the 'Project manager' field in the 'Projects' collection is a 'Single reference to other record' field type. It references to the employee collection, where the user login is defined.
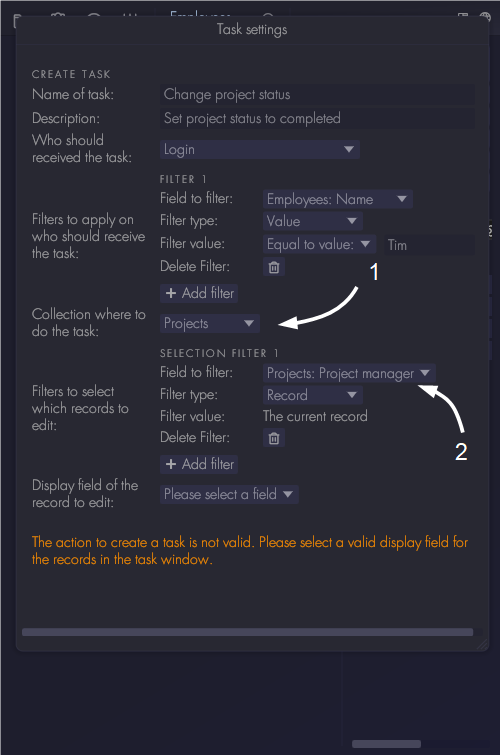
Next select which field to show in the task table of the user who should receive the task. In task window a table will be shown with all current tasks. The 'Display field' will help the user to recognize which tasks are still to be done.
Finally, define what the user should do in order to complete the task. There are two ways of doing this:
- Use the 'Selection filter' that was used to determine if the record should be added as a task to see if the task is completed. If the record does not pass the selection filter any more, the task will be considered completed.
- Define a new filter which Aptono can use the determine if the task is completed. In the settings window this filter is called 'Completion filter'. If the record passes the new filter, the task will be considered completed.
Note that if no completion filter is defined, Aptono will use the selection filter. In the example, the user is required to change the field 'Project status' to the value 'Completed'.
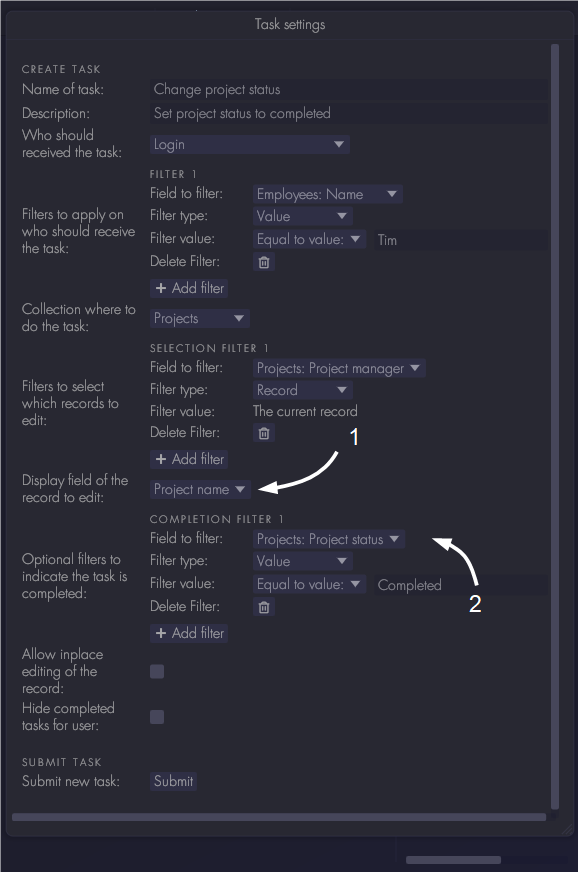
There are two more settings in the task window:
- Allow in-place editing of the record. When enabled, the relevant fields of the record will be shown in the task table of the user, allowing editing right there in the table. This can be a convenience when the user has a lot of tasks, because the user does not have to open every record separately to complete the task. Note that the user might not see relevant context this way, so use with caution.
- Hide completed tasks. When enabled, tasks that are completed will not be shown to the user anymore. They will still be visible in the task overview window in the collection settings.
Click on submit to finalize the task.
Endpoints
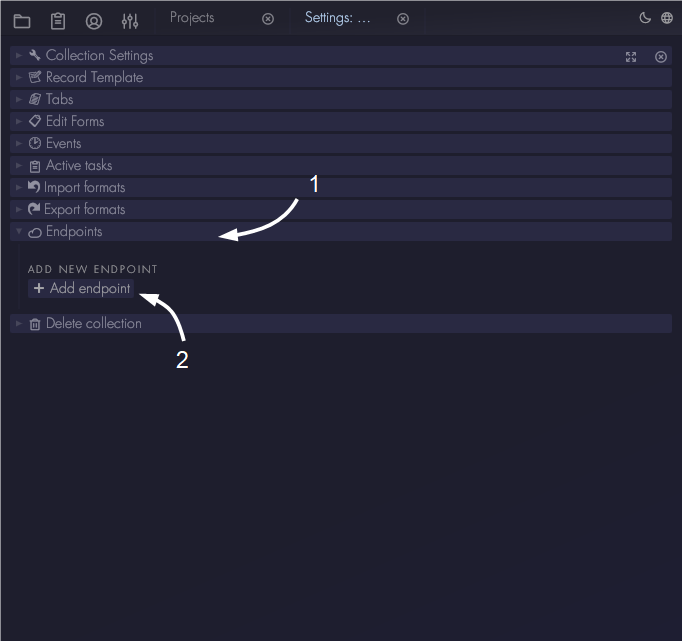
Endpoints are used for connecting to other software in your organization. For each collection multiple endpoints can be created. Those endpoints will only have access to data in that particular collection. To create an endpoint, go to the collection settings (see here). Then go to the 'Endpoints' section of the settings window and click on 'Add endpoint':
The new endpoint will appear in the list when it created by the server. Note that each endpoint requires one endpoint license. If there are not enough licenses available and you want to add new licenses, please refer to this section.
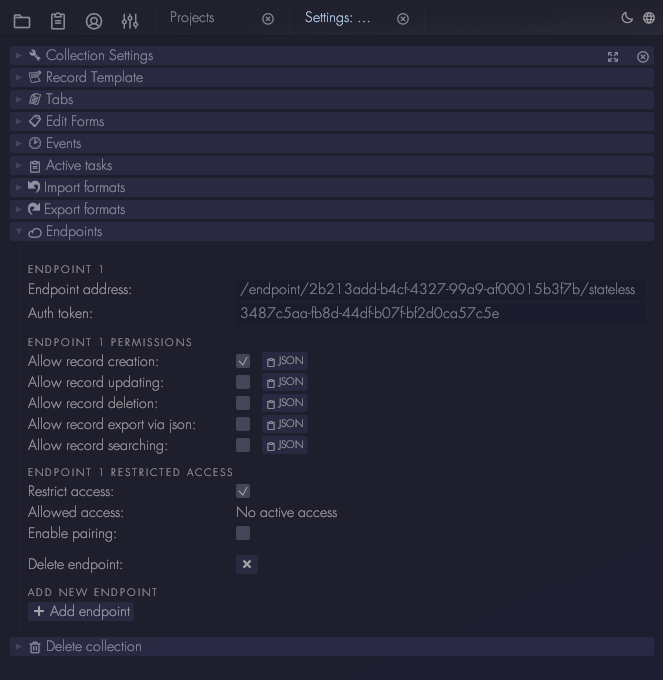
The pathname to use the new endpoint is shown in the 'Endpoint address' entry. Combine this with the full domain of the Aptono dashboard to get the full url. So for example:
- https://app.myaptonoapp.com/endpoint/2b213add-b4cf-4327-99a9-af00015b3f7b/stateless
Every request to the endpoint needs to provide an authentication code. This code provides access to the data within the collection, so it should be handled with care. Aptono expects that endpoints requests are send with a Json payload of a certain format. For each of the allowed actions an example Json payload is provided by clicking on the 'JSON' behind the button.
Endpoint actions
Five actions are available:
- Record creation: create a new record in the collection by passing the right data via JSON
- Record updating: specify which record and which field to update
- Record deletion: delete a record by sending its id
- Record searching: find a list or records that match the specified filter
- Record exporting: receive the data of a record via JSON by sending its id
Endpoint access restriction
To increase security, it is possible to restrict access to the endpoint based on which ip address the request was made. Note that this only works if the user of the endpoint does not use a dynamic ip address. To restrict access to the endpoint, make sure the 'Restrict access' option is enabled. To grant access to a certain ip address, enable the option 'Enable pairing'. When enabled, Aptono will monitor and list all ip addresses that reach out to the endpoint. You add items to the 'allowlist' to grant access to the endpoint. Note that when the 'Restrict access' option is not enabled, every ip address gets access to the endpoint.
CSV Import
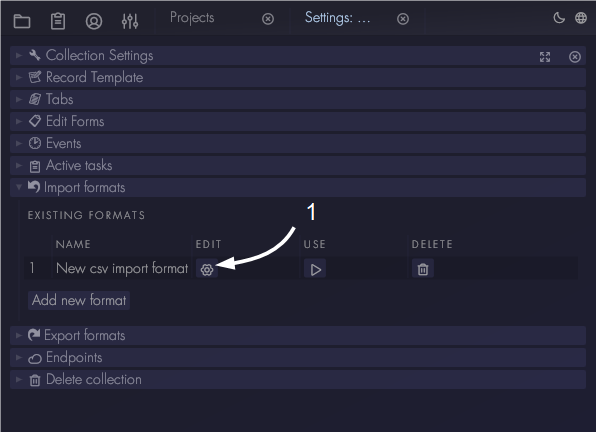
Aptono can import data via CSV files. To import a csv file, Aptono first needs to have an import format. This can be defined by collection administrators in the collection settings window (see here). Go to the 'Import formats' section and click on the 'Add new format' button:

A new format will appear in the list. Click on the settings icon to open the settings window:
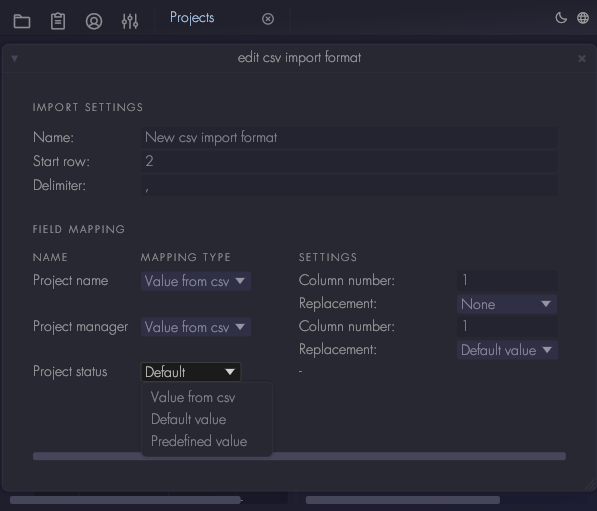
Add a name to allow users to recognize when to use this format. The 'Start row' option indicates on which line the data starts. This can be used to skip any header data in the csv file. Then specify the delimiter used in the csv file.
All fields in the collection that can be imported via csv will be shown in a list. A mapping can be specified that indicates how Aptono should import data. There are three options:
- Value from csv: specify which column contains the data for this particular field.
- Default value: the default value of the collection template will be used. Note that this value should valid, otherwise the record will be rejected.
- Predefined value: fill in a value that should be used for all rows.
Select a column number, to indicate in which column the current field can be found.
If there are fields in the collection that cannot be imported via csv, they will not be shown here. Aptono will attempt to fill in the default values as defined in the record template. For this to be successful, the default values need to be valid.
Missing data in csv data
Aptono will scan all rows of the csv file, starting from the 'Start row'. It will attempt to create records with the data that is found. Some csv files might not have all rows filled in. You can specify how to deal with missing data by choosing one of three options in the 'Replacement' field:
- None: the row will not be converted to a record and an error message will be shown.
- Default: use the current default value in the record template to fill in missing data.
- Custom value: indicate which value to use.
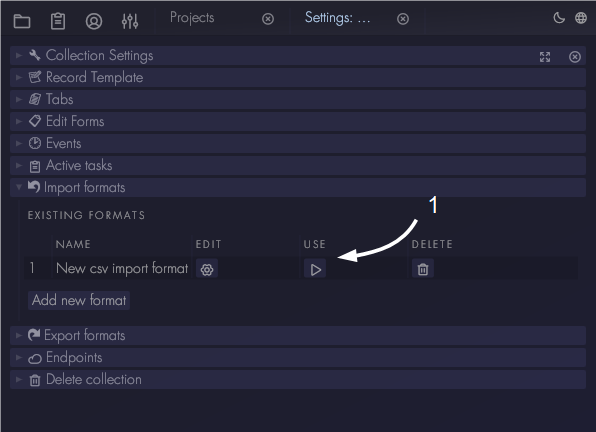
Using the csv import format
To import a csv file, close the format settings window to back to the collection settings window. In the 'Existing formats' table, click on the 'Use' button of the created csv import format:
A file selection window will be shown. Select a csv file and open it. Aptono will start analyzing the csv file. A result window will be shown. If there were no errors, the result will look as follows. Click on submit to send the data to the server:
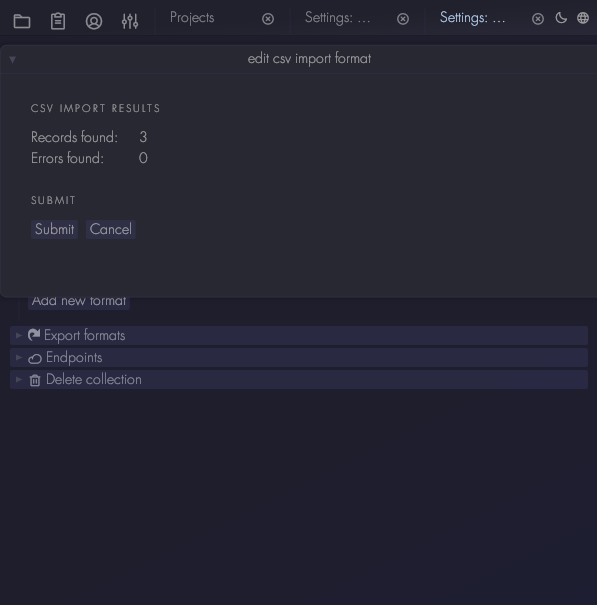
If there were errors, these will be shown in the result window. You can choose to abort the operation, or to send the records that were successful.

After the data was send to Aptono, it will be checked by the validators of the record template. There it still might be rejected. If not, the records will be added to the collection.
Field data type import format
| Field data type | Format |
|---|---|
| Text, Markup, Folder, Password, Unique id, Email, Url | Regular text |
| Decimal, Currency | Numbers using a decimal dot (.) |
| Integer, Day / Week / Month / Quarter / Year number | Integer numbers |
| Date, Point in time | Year-month-day Hour:Minute:Second |
| Year-month-dayTHour:Minute:Second | |
| Year-month-dayTHour:Minute:Second+Timezone (either 01:00 or CST) | |
| Year-month-dayTHour:Minute:Second Timezone (either 01:00 or CST) | |
| ISO 8601 without timezone | |
| ISO 8601 with UTC timezone | |
| ISO 8601 with offset | |
| RFC 3339 with fractional seconds and UTC | |
| All above but with day first | |
| All above but no leading zeros | |
| Boolean True | Any of the following, case insensitive: 1, yes, y, confirm, confirmed, accept, accepted, on, enable, enabled, valid, success, exist, exists, positive, active |
| Boolean False | Any of the following, case insensitive: 0, no, not, n, deny, denied, reject, rejected, off, disable, disabled, invalid, fail, failure, nonexistent, negative, inactive |
| Right tags | Regex match: r"Righttag: (\w+), level: (\d+)" |
| Reference to other record | Uuid of the record |
| Other | Not supported |
Importing multi value fields
To import multivalue fields, make sure that the data for the separate values is in one column, separated by '<!&&!>'. For example: value1 <!&&!> value 2. This marker tells Aptono that there are multiple values in the column.
Limitations
Currently the csv import function can only be used by collection administrators. In the future a widget will be added such that collection visitors can use the created templates as well.
CSV Export
Aptono can export data via CSV files. To export a csv file, Aptono first needs to have an export format. This can be defined by collection administrators in the collection settings window (see here). Go to the 'Export formats' section and click on the 'Add new format' button:
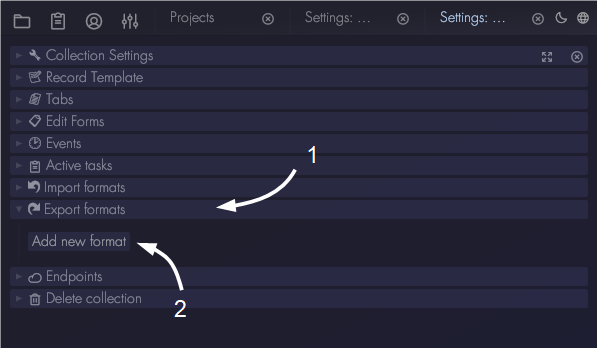
A new format will appear in the list. Click on the settings icon to open the settings window:
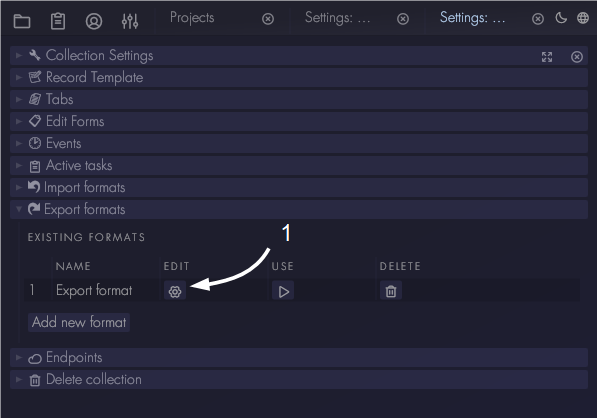
Add a name to allow users to recognize when to use this format. The option 'Include header' will add the field names of the record template to the first row of the generated csv. Click on 'Add column' to map a field of the collection to a column of the csv:
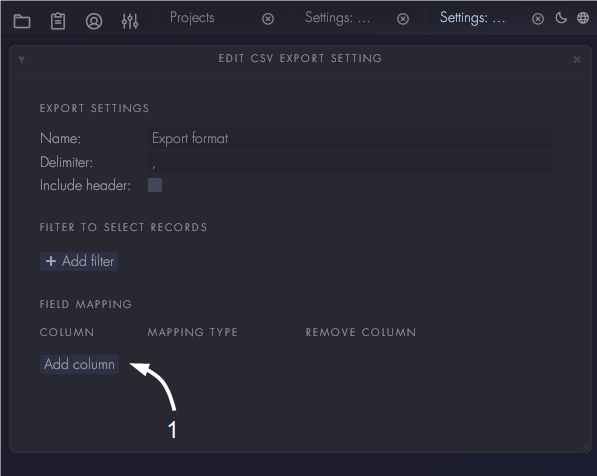
Select one of the available fields, or select 'Empty' if you want to leave a column empty.
Select which records to export
A filter can be defined to select the records that need to be exported to the csv file. If the filter is left empty, all records of the collection will be exported.
Using the csv export format
To export a csv file, close the format settings window to back to the collection settings window. In the 'Existing formats' table, click on the 'Use' button of the created csv export format:
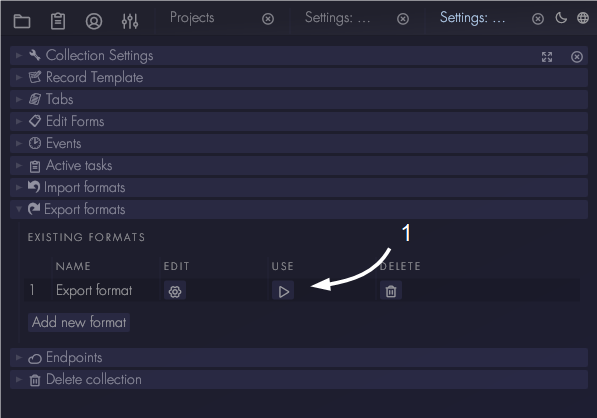
The csv will be added to the downloads of your browser / app.
Limitations
Currently the csv export function can only be used by collection administrators. In the future a widget will be added such that collection visitors can use the created templates as well.
🚧 Markup
Aptono uses markup text to define what collections and records should look like when users open them. In markup text additional instructions are added to the text that tell Aptono how to display the text and widgets.
Markup is used by the following items:
- Custom edit forms of records, see here
- Custom tabs for collections, see here
- Markup field data type, see here
The markup editor
When using the markup editor, right click on the editor to open a menu that helps with formatting the document.
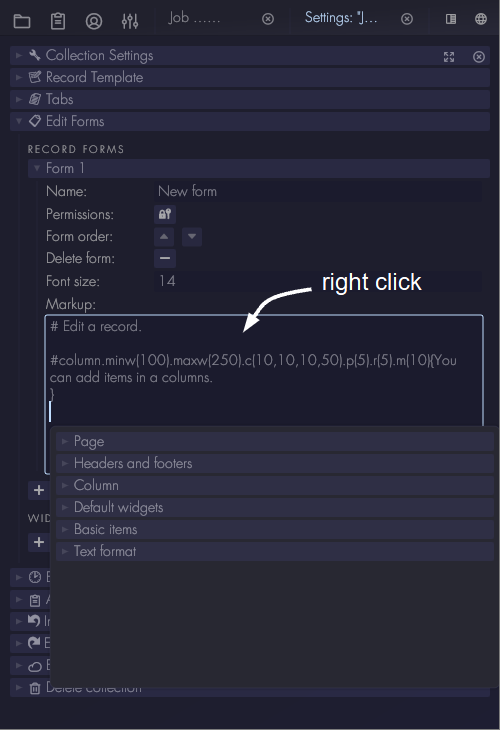
It will open a menu with all the available formatting options.
Page formatting
You can choose the display format of the document. This is the format that will be shown when the user opens the document and reviews it in the dashboard. This will also be the default size when the user decides to print the document. For printing other formats can be selected as well.
To display a document as an A4 page, add the following formatting to the markup editor:
#page.s(a4)
The .s stands for 'size'. Formats A0 to A5 are available. To add a page format with custom dimensions, add the following to the markup editor:
#page.w(200).h(200)
The .w stands for 'width', the .h stands for 'height'. Note that the sizes are in mm.
To display the page in landscape mode, add the '.ls' to the page formatting:
#page.s(a4).ls
Note that you can only add one page size instruction per document.
Page margins
Aptono by default adds a 10 mm margin to the page layout. This can be changed by adding the margin indicator to the page formatting. For example, to add a 25 mm margin to the layout, add the following.
#page.m(25)
Where the '.m' stands for margin.
Display page border in dashboard
Sometimes its useful to show the actual page to the user. To do this, add '.show' to the page formatting:
#page.s(a4).show
Note that the '.show' modifier needs to be last modifier of the page. Below an example is shown without and with the page border shown:
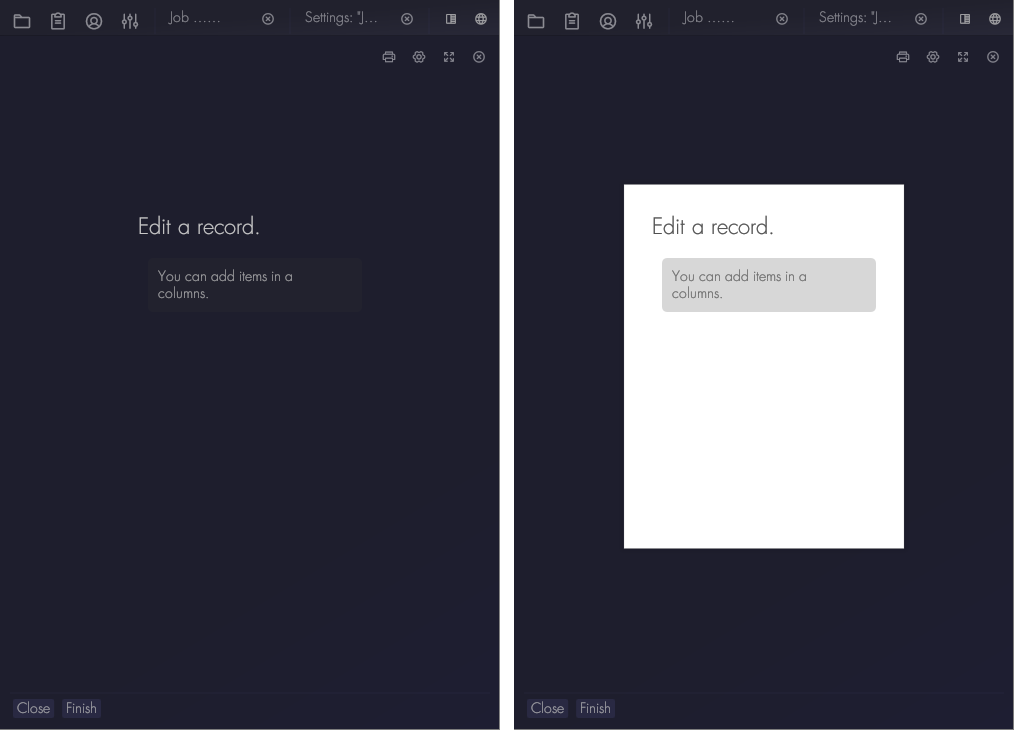
Combine all modifiers into one statement
Note that all page format modifiers should be added to one statement. For example, to format a page to have a size A5, show its border, show it as landscape and modify its margin to be 25mm, add the following statement:
#page.s(a5).ls.m(25).show
Page breaks
If the document has a fixed height, it is possible to add page breaks to the document. To add a page break to the page, add the following statement:
#pb
Everything that follows will be printed onto the next page.
Sometimes its useful to have items stick to the bottom of the page. For example a closing statement or a signature line. To do this add the following statement to the markup editor:
#bottom
Everything that follows will be placed at the bottom of the page. Combine this with the '#pb' statement to control which items should be grouped to the bottom. For example, consider the following formatting:
#page.s(a5).m(20).show
# Hello, this is a header


This is normal text, add a nice story here.

#bottom

Everything that follows will stick to the bottom of the page.

This will also stay at the bottom. To go to the next page, add a new pagebreak.

#pb

This will be on the next page.
This will result in the following page:

Headers and footers
To add a page header to the current page, add the following statement to the markup editor:
#header.h(30){#fs(10)Hello from header
---}
- The '.h(30)' indicates that the header should have a height of 30mm.
- The '#fs(10)' indicates that the font size should be 10 points.
- The '---' adds the line to the header.
Its possible to add headers that will be show through out the whole document. This is called a sticky page header. To make a page header sticky, add the '.sticky' modifier to the header statement:
#header.h(30).sticky{#fs(10)Hello from header
---}
The sticky header will remain active until a new header is defined.
Note that the same applies for page footers. A common pattern is to add page numbers to the footer. A template is added to the right click menu.
🚧 Widgets
🚧 Users and logins
🚧 Create a new user
🚧 Delete a user
🚧 Password
🚧 WebAuthn
Permissions
Aptono uses permissions to determine which information can and cannot be send to which user. There are three types of permissions:
- Permission tags
- Individual permissions
- Parametric permissions
- Creator right
Each type and its use case is explained below.
Permission tags
Permission tags are used for grouping login accounts that need to have the access to the same information. This can be multiple collections, tabs, records or forms. It can also be useful if you want give a login accounts access to multiple collections without having to add it to all the separate collections one by one. You can imagine a permission tag as a key that fits in multiple keyholes.
To create a new permission tag, make sure you are logged in as administrator and go to the admin window (see here). Click on the 'Permissions' section. Then click on 'Add Tag':
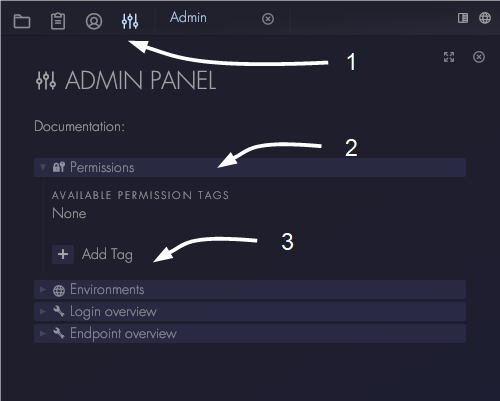
A new permission tag will be added to the 'Available permissions' list. You can modify its name and description. The list also monitors its use throughout the dashboard. 'Uses' indicates in how many places the tag is required to get permission to the data (collection, tab, form, etc). 'Providers' indicates in how many locations the tag is provided in a field to assign to a login account.
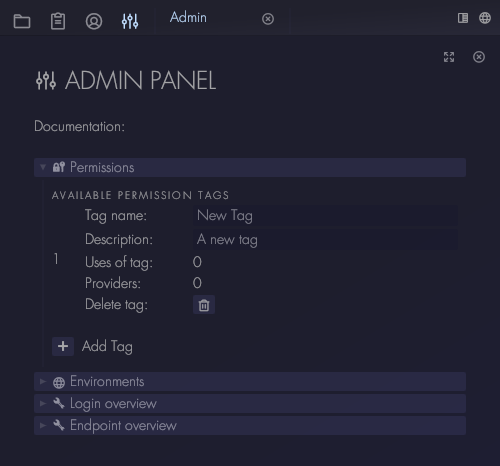
Individual permissions
Permissions can be granted based on a single user. The user is selected by its 'Display name', which is the name assigned to the login account, in the field where the login account is created.
Parametric permissions
Parametric permissions allow a collection administrator to grant users access to data based on the data within an record. Parametric permissions can be used in the following collections permission settings only:
- Read record
- Update record
To define a parametric permission, the collection needs to have either have a field with a login data type directly, or reference to a record with a field with the login data type. This can be a single reference or a multi reference field type.
To make its use case a bit more clear: image a collection 'Project' that has a field called 'Team members' which is of type 'Multi reference to other record', which references to a collection 'Employees'. The collection 'Employees' has a field with the login data type. In some cases it might be desired to only allow 'Team members' to update the 'Project' record. To do this, the administrator of the 'Projects' collection uses a parametric permission, that refers the 'Team members' field. Note that logins accounts can only be one reference away from the collection where the parametric permission is defined.
Creator right
Creator rights are assigned by default when a new collection or environment is created. This gives access to the login account which has created the collection or environment. Note that this permission can be deleted if desired.
Using the permissions window
To set permissions for a certain object, click on the padlock icon. Then click on the 'Add right' button:

Depending on where the permission will be created (environment, collection etc), different types of permissions will be available.
🚧 Assigning permissions to users
Permissions, creating records and sections
Record creation, collection permissions and section permissions.
Visitors always need the visitor/create records permissions in order to create records. But they do not need all the permissions of every section of the collection.
Imagine a collection that has two sections: for simplicity lets call them 'section one' and 'section two'. A user has the permissions to create records, but does not have the permissions to access 'section two'. This will mean that when this user sends a new records, it will not have 'section two' included. If 'section two' has fields that are all valid by default, then the Aptono will add those default values to the incomplete new record that was create by the user. If there a invalid default values in 'section two', the incomplete new record of the user will be rejected.
🚧 Filters
🚧 Restore
🚧 Deleting data
Environments
Environments are the containers of the collections. Every collection is part of an environment. Most Aptono setups have one main environment where every collection lives. Additional environments are typically used for experimenting with different collection definitions and workflows.
Good to know
- Collections within one environment can reference to each other. Collections from different environments cannot.
- Login accounts can be added to any environment. Make sure to not leave enabled login accounts in an environment that is only used for testing, because they will be counted in the license checks.
Create an environment
Every Aptono installation comes with a predefined environment called "Main Environment". To create an additional environment, go the admin settings window, click on "Environments" and click the "Add environment" button:
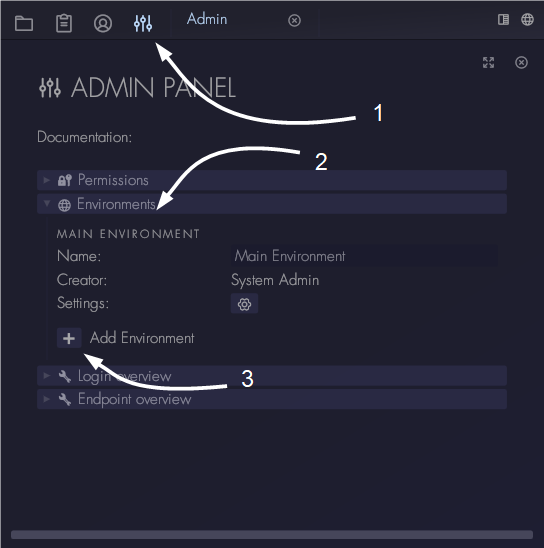
This will add a new environment to the database and it will be shown under the "Other Environments" section. There are a couple of options available:
- Rename the environment in the name section. The name is only used for identifying the environment, it is not used anywhere else.
- You can make the new environment the default environment. This means that every user that logs into Aptono will see that environment. See also #1 marked below in the picture.
- You can open the environment. This will close all tabs and startup the selected environment.
- Change the order of the environments. The environment at top (at the "Main Environment section) is shown to users without admin permissions. The order in the "Other Environments" section has no real meaning other than to organize the list itself.
- Open the settings of the environment, where you can change its permission settings.
- Environments that are not currently the "Main Environment" can be deleted by pressing the delete button.
Environment settings
To open the environment settings, make sure you are logged in as a administrator login account. Then go to the settings tab (see here) and click on 'Environments'. In the drop down there is settings button that will open the settings window.
A tab will open that shows the different permissions related to the environment. By clicking on the padlock symbol a popup will open where permissions can be added or removed. For more information about this see the Permissions section.
Environment admins
Environment admins are login accounts that can make changes to the settings of the environment. They can change the permissions and the name of the environment.
Visitors
Environment visitors can open the environment and will see the collections the main folder. They cannot make changes to the environment itself.
Permission to create collections
As a environment visitor you need to have the right permissions to be able to create collections in the environment. These can be added in the environment settings window.
The admin tab
When logged in as administrator, you can open the admin tab. In this tab there are the following settings:
To open the admin page, click on the settings logo on top left corner of the dashboard:
🚧 Data management strategies
🚧 Frequently asked questions
Permissions
I just added some permissions to a collection, but the it does not show up in the users dashboard. What to do?
The dashboard does not constantly check if there were permissions changes for all cases. Sometimes it is required that the users first signs out and then logs in again for the data to appear.
Using Aptono in the browser
Is it possible to have two different login accounts open in the same browser?
In some browsers this will not work correctly because Aptono uses a service worker and the accounts get mixed when they are open at the same time. In Chrome it is possible to open different user accounts in private tabs. This is a fixable issue and will be resolved in the future.